Implementing Slimbox in Blogger

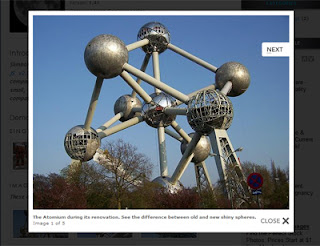
Slimbox 2 is a very small size visual clone of the popular Lightbox 2, written using the jQuery javascript library. It is designed to be very small, efficient, standards-friendly and fully customizable

It is compatible with all modern browsers: Firefox 2+, Internet Explorer 6+, Opera 9+ and Opera for Wii, Safari 3+, Camino and Google Chrome.It works with both strict mode and quirks mode web pages.Unlike many Lightbox-like scripts, it displays fine in case of horizontal scrolling of the web page.


Steps to Add it to Blogger:


1.Login to the Blogger account.

2. Now Go to Design > Edit HTML.


3.Now search for the </head> tag and paste the following code just Above/Before it. 

<script src="http://dl.dropbox.com/u/27675057/slimbox-1.71a/slimbox-1.71a/js/mootools.js" type="text/javascript">  
</script>
<script src="http://dl.dropbox.com/u/27675057/slimbox-1.71a/slimbox-1.71a/js/slimbox.js" type="text/javascript">
</script>
<link href="http://dl.dropbox.com/u/27675057/slimbox-1.71a/slimbox-1.71a/css/slimbox.css" media="screen" type="text/css"></link>


2.Go to the Post/Page you want to add the Slimbox and go to Edit HTML tab .


3.Now copy the code from below and paste it there.


<script src="http://dl.dropbox.com/u/27675057/slimbox-1.71a/slimbox-1.71a/js/mootools.js" type="text/javascript">  
</script>
<script src="http://dl.dropbox.com/u/27675057/slimbox-1.71a/slimbox-1.71a/js/slimbox.js" type="text/javascript">
</script>
<link href="http://dl.dropbox.com/u/27675057/slimbox-1.71a/slimbox-1.71a/css/slimbox.css" media="screen" type="text/css"></link>


4.Now for adding the images into Slimbox, Firstly add the image normally using Insert Image button


Now When you see the code in the edit HTMLwindow it would be something like this


<a href=" large3.jpg"=""><img border="0" height="90" src="/small3.jpg" width="120" /></a>


Make it like this


<a href=" " rel="lightbox" ><img src=" " /></a>

As you can see we added only a rel=lightbox".
For making a Gallery add the following code 


<a href=" " rel="lightbox-g1" ><img src=" " /></a>

5.Now save the Post/Page andsee the magic.

Note:Please Host all the files on free hosting service like DropBox  or Blogspot itself !


Another Important thing to note is that all the images used in this tutorial like Next button ,Previous button ,etc are all hosted on Google Code service which are the fastest and most reliable servers on the internet with the least downtime.So you can easily implement this with no hassles for Image Hosting.
             

Implementing Picbox in Blogger

Picbox is a lightweight javascript image viewer, which differentiates itself by allowing easy viewing of images larger than the available screen size.

It features automatic resizing and zooming of large images, allowing them to fit in the browser or be viewed at full size.


Steps to Add it to Blogger:


1.Login to the Blogger account.

2. Now Go to Design > Edit HTML.


3.Now search for the </head> tag and paste the following code just Above/Before it. 

<script type="text/javascript" src="http://ajax.googleapis.com/ajax/libs/jquery/1.4.2/jquery.min.js"></script>  
<script src="http://dl.dropbox.com/u/27675057/Picbox-2.2/Picbox-2.2/js/picbox.js" type="text/javascript">
</script>
<link href="http://dl.dropbox.com/u/27675057/Picbox-2.2/Picbox-2.2/css/picbox.css" media="screen" rel="stylesheet" type="text/css"></link>

2.Go to the Post/Page you want to add the Picbox and go to Edit HTML tab .


3.Now copy the code from below and paste it there.


<script type="text/javascript" src="http://ajax.googleapis.com/ajax/libs/jquery/1.4.2/jquery.min.js"></script>  
<script src="http://dl.dropbox.com/u/27675057/Picbox-2.2/Picbox-2.2/js/picbox.js" type="text/javascript">
</script>
<link href="http://dl.dropbox.com/u/27675057/Picbox-2.2/Picbox-2.2/css/picbox.css" media="screen" rel="stylesheet" type="text/css"></link>


4.Now for adding the images into Picbox,Firstly add the image normally using Insert Image button


Now When you see the code in the edit HTMLwindow it would be something like this


<a href=" large3.jpg"=""><img border="0" height="90" src="/small3.jpg" width="120" /></a>


Make it like this


<a href=" " rel="lightbox" ><img src=" " /></a>

As you can see we added only a rel=lightbox".
For making a Gallery add the following code


<a href=" " rel="lightbox-g1" ><img src=" " /></a>

5.Now save the Post/Page andsee the magic.

Note:Please Host all the files on free hosting service like DropBox  or Blogspot itself !


Another Important thing to note is that all the images used in this tutorial like Next button ,Previous button ,etc are all hosted on Google Code service which are the fastest and most reliable servers on the internet with the least downtime.So you can easily implement this with no hassles for Image Hosting.
             

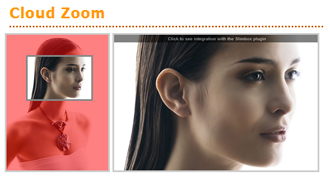
Implementing Cloud Zoom in Blogger

Cloud Zoom is a lightweight, highly customizable jQuery plugin that allows you to add image zooming in your web pages. You can use this plugin to create zoomable images with different features such as tint effect, inner zoom and soft focus. It is a cross browser plugin that works in all major web browsers including IE6.

Cloud Zoom is very easy to implement and is very well documented. You can easily customize the appearance of the smaller image, lens and zoom window using CSS. It offers several configuration options enabling you to customize its behavior including: height, width & positions of zoom window; tint; opacity; amount of smoothness/drift of the zoom image as it moves; enable or disable titles.


Steps to Add it to Blogger:


1.Login to the Blogger account.

2. Now Go to Design > Edit HTML.


3.Now search for the </head> tag and paste the following code just Above/Before it. 

<link href="http://dl.dropbox.com/u/27675057/Cloud%20Zoom/cloud-zoom.css" rel="stylesheet" type="text/css" />   
<script type="text/javascript" src="http://ajax.googleapis.com/ajax/libs/jquery/1.4.2/jquery.min.js"></script>
<script src="http://dl.dropbox.com/u/27675057/Cloud%20Zoom/cloud-zoom.1.0.2.js" type="text/JavaScript">
</script>

2.Go to the Post/Page you want to add the Cloud Zoom 

Now go to Edit HTML tab .


3.Now copy the code from below and paste it there.


<link href="http://dl.dropbox.com/u/27675057/Cloud%20Zoom/cloud-zoom.css" rel="stylesheet" type="text/css" />   
<script type="text/javascript" src="http://ajax.googleapis.com/ajax/libs/jquery/1.4.2/jquery.min.js"></script>
<script src="http://dl.dropbox.com/u/27675057/Cloud%20Zoom/cloud-zoom.1.0.2.js" type="text/JavaScript">
</script>

4.Now for adding the elements,for example you have to add image into Cloud Zoom,Firstly add the image normally using Insert Image button


Now When you see the code in the edit HTMLwindow it would be something like this


<a href=" large3.jpg"=""><img border="0" height="90" src="/small3.jpg" width="120" /></a>


Make it like this


<a class="cloud-zoom" href="large.jpg" id="zoom1" rel="adjustX: 10, adjustY:-4, softFocus:true"><img align="left" alt="" src="small3.jpg" /></a>


As you can see we added only a class="cloud-zoom" and add a id tag for adding gallery files.
For multiple images together add the following code after the above code


<a class="cloud-zoom-gallery" href="http://dl.dropbox.com/u/27675057/Cloud%20Zoom/20.jpg" rel="useZoom: 'zoom1', smallImage: 'http://dl.dropbox.com/u/27675057/Cloud%20Zoom/20%20%283%29.jpg' " title="Thumbnail 1"> 
<img alt="Thumbnail 1" src="http://dl.dropbox.com/u/27675057/Cloud%20Zoom/20%20%282%29.jpg" /></a>


<a class="cloud-zoom-gallery" href="http://dl.dropbox.com/u/27675057/Cloud%20Zoom/74.jpg" rel="useZoom: 'zoom1', smallImage: 'http://dl.dropbox.com/u/27675057/Cloud%20Zoom/74%20%283%29.jpg' " title="Thumbnail 2"><img alt="Thumbnail 2" src="http://dl.dropbox.com/u/27675057/Cloud%20Zoom/74%20%282%29.jpg" /></a>


Here is a list of parameters and there description included in main JavaScript file of Cloud Zoom:


ParameterDescription (from V1.0.0)Default Value
zoomWidthThe width of the zoom window in pixels. If 'auto' is specified, the width will be the same as the small image.'auto'
zoomHeightThe height of the zoom window in pixels. If 'auto' is specified, the height will be the same as the small image.'auto'
positionSpecifies the position of the zoom window relative to the small image. Allowable values are 'left', 'right', 'top', 'bottom', 'inside' or you can specifiy the id of an html element to place the zoom window in e.g. position: 'element1''right'
adjustXAllows you to fine tune the x-position of the zoom window in pixels.0
adjustYAllows you to fine tune the y-position of the zoom window in pixels.0
tintSpecifies a tint colour which will cover the small image. Colours should be specified in hex format, e.g. '#aa00aa'. Does not work with softFocus.false
tintOpacityOpacity of the tint, where 0 is fully transparent, and 1 is fully opaque.0.5
lensOpacityOpacity of the lens mouse pointer, where 0 is fully transparent, and 1 is fully opaque. In tint and soft-focus modes, it will always be transparent.0.5
softFocusApplies a subtle blur effect to the small image. Set to true or false. Does not work with tint.false
smoothMoveAmount of smoothness/drift of the zoom image as it moves. The higher the number, the smoother/more drifty the movement will be. 1 = no smoothing.3
showTitleShows the title tag of the image. True or false.true
titleOpacitySpecifies the opacity of the title if displayed, where 0 is fully transparent, and 1 is fully opaque.0.5

5.Now save the Post/Page andsee the magic.


Note:Please Host all the files on free hosting service like DropBox  or Blogspot itself !
             

Implementing Pirobox in Blogger

Pirobox is a jQuery plugin that you can use to create Lighbox widget with support for multiple image sets and slideshows.It also allows for embedding YouTube and Vimeo videos. It offers keyboard navigation, PNG Fix for IE6 and will automatically check for broken links to image files and display appropriate message. Pirobox is cross browser plugin that works on FireFox 2+, Opera9.5+, Chrome, Safari (Mac/Windows),IE 6+.

Implementation is straightforward like any other lightbox. Pirobox comes with three built in styles: shadow,white or black and can be easily configured to customize behavior. Configuration options include: animation speed; background opacity; radius of the rounded corners; slideshow speed, previsou and next button placement, etc.


Steps to Add it to Blogger:


1.Login to the Blogger account.

2. Now Go to Design > Edit HTML.


3.Now search for the </head> tag and paste the following code just Above/Before it. 


<link href="http://dl.dropbox.com/u/27675057/Pirobox/style.css" media="screen" rel="stylesheet" type="text/css"></link>    
<script src="http://dl.dropbox.com/u/27675057/Pirobox/jquery.min.js" type="text/javascript"></script>
<script src="http://dl.dropbox.com/u/27675057/Pirobox/pirobox_extended_min.js" type="text/javascript"></script>
<script type="text/javascript" src="http://dl.dropbox.com/u/27675057/Pirobox/jquery-ui-1.8.2.custom.min.js"></script>

Now search for the </body> tag and paste the following code just Above/Before it.

<script type="text/javascript">   
$(document).ready(function() {
$().piroBox_ext({
piro_speed : 700,
bg_alpha : 0.5,
piro_scroll : true // pirobox always positioned at the center of the page
}); });
</script>


2.Go to the Post/Page you want to add the PiroBox and go to Edit HTML tab .

3.Now copy the code from below and paste it there.

<link href="http://dl.dropbox.com/u/27675057/Pirobox/style.css" media="screen" rel="stylesheet" type="text/css"></link>    
<script src="http://dl.dropbox.com/u/27675057/Pirobox/jquery.min.js" type="text/javascript"></script>
<script src="http://dl.dropbox.com/u/27675057/Pirobox/pirobox_extended_min.js" type="text/javascript"></script>
<script type="text/javascript" src="http://dl.dropbox.com/u/27675057/Pirobox/jquery-ui-1.8.2.custom.min.js"></script>
<script type="text/javascript">
$(document).ready(function() {
$().piroBox_ext({
piro_speed : 700,
bg_alpha : 0.5,
piro_scroll : true // pirobox always positioned at the center of the page
}); });
</script>


4.Now for adding the elements,for example you have to add image into Pirobox ,Firstly add the image normally using Insert Image button


Now When you see the code in the edit HTML window it would be something like this


<a href=" large3.jpg"=""><img border="0" height="90" src="/small3.jpg" width="120" /></a>


Make it like this


<a class="pirobox_gall" href="/large3.jpg" rel="gallery"><imgborder="0" height="90" src="/small3.jpg" width="120" /></a>


As you can see we added only aclass="pirobox_gall" and add a rel tag for adding gallery files.


Some Example Codes
<a class="pirobox_gall" href="http://dl.dropbox.com/u/27675057/Pirobox/26.jpg" rel="gallery" title="Curious kitten.">  
<img alt="image" src="http://dl.dropbox.com/u/27675057/Pirobox/26s.jpg" />
</a>
<a class="pirobox_gall" href="http://dl.dropbox.com/u/27675057/Pirobox/27.jpg" rel="gallery" title="Lights"><img alt="image" src="http://dl.dropbox.com/u/27675057/Pirobox/27s.jpg" /></a>
<a class="pirobox_gall" href="http://dl.dropbox.com/u/27675057/Pirobox/29.jpg" rel="gallery" title="Sun salutation."><img alt="image" src="http://dl.dropbox.com/u/27675057/Pirobox/29s.jpg" /></a>
<a class="pirobox_gall" href="http://dl.dropbox.com/u/27675057/Pirobox/30.jpg" rel="gallery" title="Bonfire"><img alt="image" src="http://dl.dropbox.com/u/27675057/Pirobox/30s.jpg" /></a>
<h2 class="my_title">
<a href="http://www.youtube-nocookie.com/v/Bkjv9SscotY&amp;hl=it_IT&amp;fs=1?rel=0" rel="iframe-640-505" class="pirobox_gall1" title="You tube "><b style="font-size:10px;">%u25BA</b> <span class="span_f_c">You Tube</span> <b style="font-size:12px;"> Open </b><span style="font-size:10px;"> (640x505px)</span></a></h2>
<h2 class="my_title">
<a href="http://www.jquery.com" rel="iframe-full-full" class="pirobox_gall1" title="jQuery website"><b style="font-size:10px;">%u25BA </b><span class="span_f_c">jQuery </span><b style="font-size:12px;"> Open </b> <span style="font-size:10px;">(full screen)</span></a></h2>
<h2 class="my_title">
<a href="http://player.vimeo.com/video/18361415" class="pirobox_gall1" rel="iframe-900-350" title="Intro"><b style="font-size:10px;">%u25BA </b><span class="span_f_c">Vimeo </span><b style="font-size:12px;"> Open </b><span style="font-size:10px;">(900x350px)</span></a></h2>
<h2 class="my_title">
<a href="http://dl.dropbox.com/u/27675057/Pirobox/intro_ants.swf" class="pirobox_gall1" rel="iframe-900-350" title="Intro"><b style="font-size:10px;">%u25BA </b><span class="span_f_c">SWF </span><b style="font-size:12px;"> Open </b><span style="font-size:10px;">(900x350px)</span></a></h2>


5.Now save the Post/Page andsee the magic.


Note:Please Host all the files on free hosting service like DropBox or Blogspot itself !


Another Important thing to note is that all the images used in this tutorial like Next button ,Previous button ,etc are all hosted on Google Code service which are the fastest and most reliable servers on the internet with the least downtime.So you can easily implement this with no hassles for Image Hosting.
             
 
© 2009 Blogger Tips 2013 | Powered by Blogger