Showing posts with label Plugin. Show all posts

Integrating Lazy Load into Blogger

Lazy Load ImageLazy Load is a jQuery plugin which only loads Images seeable in the viewport (visible part of web page) thereby enhancing the Page Load time. The images which are out the initial visible region of the screen are loaded as the users scrolls through them. A really useful plugin for Image intensive Blog's.


See Demo


How to add this into your Blog :

1. Login to your Blogger Account


2. Go to Design > Edit HTML ( For New Blogger Interface Go to Templates > Edit HTML )


3. Search for </body> tag and paste the following Code :

<script src="http://ajax.googleapis.com/ajax/libs/jquery/1.6.2/jquery.min.js" type="text/javascript" charset="utf-8"></script>
<script src="http://stylifyyourblog1.googlecode.com/svn/trunk/lazyload.js" type="text/javascript" charset="utf-8"></script>
<script type="text/javascript" charset="utf-8">
$(function() {
$("img").lazyload({placeholder : "https://blogger.googleusercontent.com/img/b/R29vZ2xl/AVvXsEjIw16UA3NJE3i8g8APqWlJxvB0DuFuRDoNHh6YabY3WPu2VZ_3Ac01uQ_vODSBW1T7-R1_ogXN90znOTpK5dYod_9sZTa1btZzzzpCBg_LTEpDxh6WOQ21Ol_1gokplMjVna95vpWMvKZM/s1600/greys.gif"});
});
</script>

In case you experience blank Images in your Sidebar then try out this code :

<script src="http://ajax.googleapis.com/ajax/libs/jquery/1.6.2/jquery.min.js" type="text/javascript" charset="utf-8"></script>
<script src="http://stylifyyourblog1.googlecode.com/svn/trunk/lazyload.js" type="text/javascript" charset="utf-8"></script>
<script type="text/javascript" charset="utf-8">
$(function() {
$(".post-outer img").lazyload({placeholder : "https://blogger.googleusercontent.com/img/b/R29vZ2xl/AVvXsEjIw16UA3NJE3i8g8APqWlJxvB0DuFuRDoNHh6YabY3WPu2VZ_3Ac01uQ_vODSBW1T7-R1_ogXN90znOTpK5dYod_9sZTa1btZzzzpCBg_LTEpDxh6WOQ21Ol_1gokplMjVna95vpWMvKZM/s1600/greys.gif"});
});
</script>

What the following code does is it limits the scope of Lazy Load to the Post Area excluding the Sidebar.


4. Save the Template and enjoy.


Skeptical about this Plugins Effects ,well check out the Results as measured by Gtmetrix.com 


With Lazy Load Disabled :


With Lazy Load Enabled :

You might not see much difference in the Page Size (About 40 Kb) but the Page Load Time has reduced by more than Half


If you still don't Beileve it try it for yourself. Just go to Gtmetrix.com

Lazy Load Disabled URL: http://www.demo.stylifyyourblog.com/2011/10/lazy-load-disabled.html

Lazy Load Enabled URL: http://www.demo.stylifyyourblog.com/2011/10/lazy-load-enabled.html


Have a Opinion ,Share It !

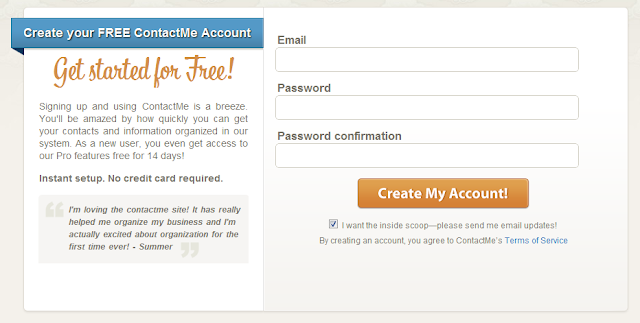
Contact Forms for Blogger

Contact Forms Image
Contact Forms are backbone of any blog/website, they provide a way for the readers to contact the author personally. As Blogger doesn't provide any inbuilt Contact Form, so we will be checking out some third party Form providers like ContactMe and Wufoo.

In this post we will see how to add to ContactMe and Wufoo forms into your Blogger Blog and also test some of the extra features these services give. Both these companies also provide premium form services but for any standard blog, there Free service is more than enough to meet all the needs.


ContactMe Forms


See Demo


1. Go to www.contactme.com  and firstly register with them


2. After Finishing the registration and Logging into your account for the first time you will be asked to Import your Contact , Skip this Step and Click on Add-Ons in the menu above .


3. After opening the Add-Ons Tab, There will be a Pre-built Form named "Untitled Form" , now just click on  Edit Form ( ContactMe doesn't allow you to create more than one form )

4. Now make changes to the form according to your needs and then click on "Save Form". Then you will be redirect back to the Add-Ons page and Now Click on Get Code


Now you will be presented with three different options for Using/Embedding your Form

>Embed The Form
   Just copy the code and paste it either into a Static Page or a Post ,wherever you want the form to appear

>Get a ContactMe Button
   Just click on "Create your Button" and customize the buttons style and select the Platform as Blogger and     then click "Generate your Button!" and then you either paste this code directly into a HTML/JavaScript Gadget or you can add it directly by clicking "Add to Blogger"

>Link To Your Form
  Just copy the link and share it on your Blog for contacting purposes


Wufoo Forms


See Demo

The above Form is Integrated into a Facebook Page

1. Go to www.wufoo.com and get yourself registered.


2. After completing the Registration process and logging into your Account you will be taken to the "Form" Tab. Just Click on "New Form!" Icon on the Upper Rigtht


3. Now for creating the Form you will see a lot of Options are present , some of its features include Multi page Form , Likerts , Multiple Choice, etc. (The File Upload option is available to premium users only )

You can use these to create Polls, Surveys ,etc as well as the normal Contact Form. Wufoo Provides option to create three separate Forms with the only drawback being that you can receive only 100 entries a month (That too is a killer deal for not paying nothing)

4. After you have finalized your Form Click on "Save Form" , you will be provided a dialog with 3 options, Click on the 2nd and setup Email Notification.


5. After setting up Email Notification Go back to the Forms Tab and below you will see your Form Name, Now click on Code and then you will be provided with 6 different ways to present your Form. I suggest you use the Embed Form Code option and get the JavaScript Code. Now just copy this into the Blogger Static Page (In Edit HTML mode)


Some others features include Customizing the CSS of the form and also very stylish Reporting options (with Pie-Charts and Bar graphs )

You are ready to go now , its upto you to decide which service suits your style. Have any suggestions or having any problems in implementing , please feel free to ask.

Zen Audio Player for your Blog

Zen Audio Player Image
Zen Audio Player a single-song HTML5 Music Player, powered by jPlayer, styled and mostly animated with CSS3. It works more or less in Firefox4, Chrome, Safari, Opera, iOS, but there are some differences in the visuals. This blends jQuery, JavaScript and CSS3 in such a way that the end product is nothing less then a visual masterpiece.There are some known cross browser compatibility issues, but none the less its a funky looking Music Player which shows whats achievable with jQuery and CSS3 alone.

In this tutorial we will be discussing how to add this Music Player into your Blogs.


See DemoDownload


Simple Steps for Adding This into your Blog:


1. Go to the Post/Page you want to add this Music Player or 

    Go to Design > Page Elements > Add a Gadget > HTML/JavaScript type Gadget for adding this in the Sidebar


2. Copy the Following Code: (How to copy code easily)


<link rel="stylesheet" href="http://yui.yahooapis.com/2.8.1/build/reset/reset-min.css">
<link rel="stylesheet" href="style.css">
<link rel="stylesheet" href="zen.css">

<script type="text/javascript" src="http://ajax.googleapis.com/ajax/libs/jquery/1.4/jquery.min.js"></script>
<script type="text/javascript" src="jquery.rotate.js"></script>
<script type="text/javascript" src="jquery.grab.js"></script>
<script type="text/javascript" src="jquery.jplayer.min.js"></script>
<script type="text/javascript" src="zen.js"></script>
Note: Please Host all the files on free hosting service like DropBox or Blogspot itself!


Note: If you already have jQuery library in your Header, then don't include it again


Here zen.js contains the link of the audio file you want to play through this player. As you may observe that there are three different formats of the same file namely mp3, m4a and ogg. This is done as different Browsers have different native audio supports. Therefore it is suggested that you add the link to different formats of your Music file for better Cross Browser compatibility.


3. Now add the Following HTML markup:


<div id="zen">
<span class="player"></span>
<span class="circle"></span>
<span class="progress"></span>
<span class="buffer"></span>
<span class="drag"></span>
<div class="button">
<span class="icon play"></span>
<span class="icon pause"></span>
</div>
</div>

This code calls in the different CSS and JavaScript classes to give you the end product a.k.a. a super stylish Music Player.


4. Now just save and enjoy the Music.


See DemoDownload

Implementing NuvuShift Lite in Blogger

The NuvuShift jQuery Plugin allows you to animate up to 5 different images or divs within a container when you move the mouse cursor around the document. Each image's movement has a independent range that can be set along with a starting pont.

Features:
>Control the amount of shift per image.
>Lightweight at only 4Kb(Lite) in size.
>Easily set and modify the starting point of each image.


Steps to Add it to Blogger:

1.Login to the Blogger account


2. Now Go to Design > Edit HTML.


3.Now search for the </head> tag and paste the following code just Above/Before it.

<script type="text/javascript" src="http://ajax.googleapis.com/ajax/libs/jquery/1.6.1/jquery.min.js"></script>
<script type="text/javascript" src="http://dl.dropbox.com/u/27675057/jquery.nuvushift.lite/sample/js/jquery.nuvushift.lite.js"></script>


2.Go to the Post/Page you want to add NuvuShift Lite and then go to Edit HTML tab .


3.Now copy the code from below and paste it there.


<script type="text/javascript" src="http://ajax.googleapis.com/ajax/libs/jquery/1.6.1/jquery.min.js"></script>
<script type="text/javascript" src="http://dl.dropbox.com/u/27675057/jquery.nuvushift.lite/sample/js/jquery.nuvushift.lite.js"></script>


4.Now adding images into NuvuShift Lite is a different process altogether .Below I will discuss the example that is implemented on the main site

Firstly the container for the images a.k.a the HTML Markup.


<div id="divOne">
<img class="img1" src="1.png" />
<img class="img2" src="2.png" />
<img class="img3" src="3.png" />
<img class="img4" src="4.png" />
<img class="img5" src="5.png" />
</div>

Now the CSS code:


<style type="text/css">
#divOne{
width:1200px;
height:500px;
overflow:hidden;
border:1px solid #111;
position:relative;
top:100px;
margin:100px auto;
box-shadow:0px 0px 100px 10px #000000,0px 0px 30px 10px #000000;
-moz-box-shadow:0px 0px 100px 10px #000000,0px 0px 30px 10px #000000;
-o-box-shadow:0px 0px 100px 10px #000000,0px 0px 30px 10px #000000;
-webkit-box-shadow:0px 0px 100px 10px #000000,0px 0px 30px 10px #000000;
}
.img1{
position:absolute;
top:-0px;
left:0px;
z-index:1;
}
.img2{
position:absolute;
top:-70px;
left:0px;
z-index:2;
}
.img3{
position:absolute;
top:-70px;
left:0px;
z-index:3;
}
.img4{
position:absolute;
top:-50px;
left:-30px;
z-index:4;
}
.img5{
position:absolute;
top:-120px;
left:-30px;
z-index:5;
}
</style>


And Finally the JavaScript code:

</script>
<script type="text/javascript">
$(document).ready(function(){
$('#divOne').nuvushift(
{
img1yStart : -100, //.img1 vertical starting point
img1xStart : 0, //.img1 horizontal starting point
img1xRange : 100, //.img1 horizontal animation range
img1yRange : 120, //.img1 vertical animation range
img1invert : 'false', //.img1 animation inverted - 'true' or 'false'
img2yStart : -10,
img2xStart : -10,
img2xRange : 650,
img2yRange : 90,
img2invert : 'false',
img3yStart : 0,
img3xStart : 0,
img3xRange : 50,
img3yRange : 180,
img3invert : 'false',
img4yStart : 0,
img4xStart : -300,
img4xRange : 400,
img4yRange : 100,
img4invert : 'true',
img5yStart : 70,
img5xStart : -90,
img5xRange : 100,
img5yRange : 90,
img5invert : 'true',
target: document, // or '#divOne', - to move when mouse hovers over #divOne etc
}); //end nuvushift
}); //end document ready
</script>

A Detailed Explanation of the Options:

  • target This is the element that triggers the movement when mouse moves over it. Set to document to move elements when the cursors moves around the whole browser window. Set to another element within '' example: target : '#divOne' or target : '.divOne',
  • img1xStart This is the x starting point for an element with the class of "img1" - set this to be the same as the "left" css property.
  • img1xStart This is the y starting point for an element with the class of "img1" - set this to be the same as the "top" css property.
  • img1xRange This is how much the element will move from left to right or right to left if inverted.
  • img1yRange This is how much the element will move from top to bottom or bottom to top if inverted.
  • img1invert Invert or reverse the animation behavior. Set to 'true' or 'false'
  • contmove Allows for animating the base container. Set to 'true' or 'false'
  • contxStart This is the x starting point for the base container - set this to be the same as the "left" css property.
  • contyStart This is the y starting point for the base container - set this to be the same as the "top" css property.
  • contxRange This is how much the base container will move from left to right or right to left if inverted.
  • contyRange This is how much the base container will move from top to bottom or bottom to top if inverted.
  • continvert Invert or reverse the base container animation behavior. Set to 'true' or 'false'


This plugin is quite similar to jParallax .Check out jParallax's Implementation in Blogger Here.

5.Now save the Post/Page.

Note: Please Host all the files on free hosting service like DropBox or Blogspot itself!


Implementing PhotoBoard in Blogger

Want to show off your Photos in a cluttered fashion, then this is the right Plugin for you. Photoboard is based on Mootools framework and gives you the capability to define a space where you can freely Drag your Pictures  (and even move them over each other!).The code is tiny, as it relies heavily on the framework for much of the functionality.


Steps to Add it to Blogger:

1.Login to the Blogger account


2. Now Go to Design > Edit HTML.


3.Now search for the </head> tag and paste the following code just Above/Before it.

<link type="text/css" href="http://dl.dropbox.com/u/27675057/Photoboard/style.css" rel="stylesheet" media="screen"> 
<link type="text/css" href="http://dl.dropbox.com/u/27675057/Photoboard/photoboard.css" rel="stylesheet" media="screen">
<script type="text/javascript" src="http://dl.dropbox.com/u/27675057/Photoboard/mootools-1.2.4-core-yc.js"></script>
<script type="text/javascript" src="http://dl.dropbox.com/u/27675057/Photoboard/mootools-1.2.4.2-more.js"></script>

Now Search for the </body> tag and Paste the following code Above/Before it.


<script src="http://dl.dropbox.com/u/27675057/Photoboard/photoboard.js"></script> 
<script>
window.addEvent('domready', function() {
var photos = new PhotoBoard('photo-board');
});
</script>


2.Go to the Post/Page you want to add PhotoBoard and then go to Edit HTML tab .


3.Now copy the code from below and paste it there.


<link type="text/css" href="http://dl.dropbox.com/u/27675057/Photoboard/style.css" rel="stylesheet" media="screen"> 
<link type="text/css" href="http://dl.dropbox.com/u/27675057/Photoboard/photoboard.css" rel="stylesheet" media="screen">
<script type="text/javascript" src="http://dl.dropbox.com/u/27675057/Photoboard/mootools-1.2.4-core-yc.js"></script>
<script type="text/javascript" src="http://dl.dropbox.com/u/27675057/Photoboard/mootools-1.2.4.2-more.js"></script>


-----------THIS AREA CONTAINS ALL THE PICTURES--------------

<script src="http://dl.dropbox.com/u/27675057/Photoboard/photoboard.js"></script>
<script>
window.addEvent('domready', function() {
var photos = new PhotoBoard('photo-board');
});
</script>


4.Now for adding the images into PhotoBoard ,See the following Markup below.


<div class="span-24 last">
<div id="photo-board" name="PhotoBoard_Controller">

<div class="photo" style="left: -43px; top: 106px;">
<img src="s.jpg"width="500" height="375">
</div>

<div class="photo" style="left: 73px; top: 137px;">
<img src="as.jpg"width="500" height="331">
</div>

<div class="photo" style="left: 37px; top: 36px;">
<img src="e.jpg"width="500" height="375">
</div>

<div class="photo" style="left: 175px; top: 133px;">
<img src="r.jpg"width="500" height="336">
</div>

<div class="photo" style="left: -32px; top: 69px;">
<img src="l.jpg"width="500" height="335">
</div>

<div class="photo" style="left: 88px; top: 147px;">
<img src="n.jpg"width="500" height="375">
</div>

<div class="photo" style="left: 255px; top: 26px;">
<img src="l.jpg"width="434" height="262">
</div>


</div>
</div>

The First Two Div tags are used for linking the pictures with the plugin and the rest of DIV tags act as containers for the Images. A class "photo" is necessary in each of these pictures. The style attribute used in every container defines the initial position of the picture.You can move the pictures in this area freely ,drag them over each other (Tip: To bring a Picture in the background to the foreground, just drag it to the corner most point and then Bring it Back)


Want to change the Dimensions of the Area occupied by the Photoboard ?
For this open photoboard.css and change the height & width attribute of #photo-board .


5.Now save the Post/Page.

Note: Please Host all the files on free hosting service like DropBox or Blogspot itself!


A Cool Music Player for Blogger

There are many ways to add Music to your blog. The most common way is to embed it into your post.In this tutorial I will be using the Wordpress Music Player to do the same.

Note:You will be needing a Free Hosting Service like Dropbox to host the SWF file.

Also You will first have to find a music file that is already hosted on the web, or if you have your own music file stored in your computer, upload it into a file host.


Steps to Add it to Blogger:

1.Login to the Blogger account


2.Go to the Post/Page you want to add the WP Music Player.


3.Now copy the code from below and paste it in the Edit HTML Tab of the respective Post/Page.


<object data="http://dl.dropbox.com/u/27675057/player.swf" height="24" id="audioplayer1" type="application/x-shockwave-flash" width="290">  <param name="movie" value="http://dl.dropbox.com/u/27675057/player.swf">
<param name="FlashVars" value="playerID=1&amp;soundFile=URL of Music File">
<param name="quality" value="high">
<param name="menu" value="true">
<param name="wmode" value="transparent">
</object>


4.For Adding multiple Players on a page just change the id in 2nd Line and the value in the in the 4th Line just as seen below


<object data="http://dl.dropbox.com/u/27675057/player.swf" height="24" id="audioplayer2" type="application/x-shockwave-flash" width="290">   
<param name="movie" value="http://dl.dropbox.com/u/27675057/player.swf">
<param name="FlashVars" value="playerID=2&amp;soundFile=http://dl.dropbox.com/u/27675057/Maid%20with%20the%20Flaxen%20Hair.mp3">
<param name="quality" value="high">
<param name="menu" value="true">
<param name="wmode" value="transparent">
</object>


← This is the Second Player of this Page

5.Now for changing the appearnace of the code see the following code:

<object data="http://www.mdn.fm/files/87478_pfe4i/player1.swf" height="24" id="audioplayer3" type="application/x-shockwave-flash" width="290">   <param name="movie" value="http://www.mdn.fm/files/87478_pfe4i/player1.swf">
<param name="FlashVars" value="playerID=audioplayer3&amp;bg=0xf8f8f8&amp;leftbg=0xeeeeee&amp;lefticon=0x666666&amp;rightbg=0xcccccc&amp;rightbghover=0x999999&amp;righticon=0x666666&amp;righticonhover=0xffffff&amp;text=0x666666&amp;slider=0x666666&amp;track=0xFFFFFF&amp;border=0x666666&amp;loader=0x9FFFB8&amp;loop=no&amp;autostart=yes&amp;soundFile=http://dl.dropbox.com/u/27675057/DivBox/music.mp3">
<param name="quality" value="high">
<param name="menu" value="false">
<param name="wmode" value="transparent">
</object>


Amazed How the player is playing when the Page just loaded ,This is because I changed the parameter "autostart" to true. Thinking where this autostart Parameter is ??, Scroll to the Extreme Right of this page and You will find it there.(The above code has shifted a little right because no space has to given in the list of parameters)


There is also a loop parameter to play the track non-stop

The Following image will explain the parameters in a more detailed manner.


This Tutorial could not have been possible without MBT ,For more customized Players check out Here.

Just for Knowledge: Google has launched a Project called Google Swiffy whose purpose is to Convert SWF files into HTML5 ,so that even devices not supporting Flash can run those SWFs. I tried to convert the player.swf but it showed some error (The Project is in its early stages) .Check out the their Gallery of Converted items Here.


Implementing Syntax Highlighter in Blogger

Syntax Highlighter is a simple JavaScript which is used to represent your Code in a more sophisticated manner.I have used this in nearly all my previous posts.In this tutorial I will be implementing Version 2.1.364 of SH. It has the ability to copy Code into the Clipboard and also supports 13 different brushes.


Steps to Add it to Blogger:

1.Login to the Blogger account


2.Go to Blogger Dashboard >Design>Edit HTML. First backup your Template (See how to Back it up)


3.Now copy the code from below and paste it just Above/Before </head> tag.


<link href='http://agorbatchev.typepad.com/pub/sh/2_1_364/styles/shCore.css' rel='stylesheet' type='text/css'/> 
<link href='http://agorbatchev.typepad.com/pub/sh/2_1_364/styles/shThemeDefault.css' rel='stylesheet' type='text/css'/>
<script src='http://agorbatchev.typepad.com/pub/sh/2_1_364/scripts/shCore.js' type='text/javascript'/>
<script src='http://agorbatchev.typepad.com/pub/sh/2_1_364/scripts/shBrushXml.js' type='text/javascript'/>
<script src='http://agorbatchev.typepad.com/pub/sh/2_1_364/scripts/shBrushBash.js' type='text/javascript'/>
<script src='http://agorbatchev.typepad.com/pub/sh/2_1_364/scripts/shBrushCpp.js' type='text/javascript'/>
<script src='http://agorbatchev.typepad.com/pub/sh/2_1_364/scripts/shBrushCSharp.js' type='text/javascript'/>
<script src='http://agorbatchev.typepad.com/pub/sh/2_1_364/scripts/shBrushCss.js' type='text/javascript'/>
<script src='http://agorbatchev.typepad.com/pub/sh/2_1_364/scripts/shBrushJava.js' type='text/javascript'/>
<script src='http://agorbatchev.typepad.com/pub/sh/2_1_364/scripts/shBrushJScript.js' type='text/javascript'/>
<script src='http://agorbatchev.typepad.com/pub/sh/2_1_364/scripts/shBrushPhp.js' type='text/javascript'/>
<script src='http://agorbatchev.typepad.com/pub/sh/2_1_364/scripts/shBrushPython.js' type='text/javascript'/>
<script src='http://agorbatchev.typepad.com/pub/sh/2_1_364/scripts/shBrushRuby.js' type='text/javascript'/>
<script src='http://agorbatchev.typepad.com/pub/sh/2_1_364/scripts/shBrushSql.js' type='text/javascript'/>
<script src='http://agorbatchev.typepad.com/pub/sh/2_1_364/scripts/shBrushVb.js' type='text/javascript'/>
<script src='http://agorbatchev.typepad.com/pub/sh/2_1_364/scripts/shBrushPerl.js' type='text/javascript'/>

See only the first Three Line of code is necessary ,rest of the code is dependent on which Brush you want to use .For example if you want to use XML Brush then include only XML related file.

4.Now include the following code just Above/Before the </body> tag.


<script language='javascript'> 
SyntaxHighlighter.config.bloggerMode = true;
SyntaxHighlighter.config.clipboardSwf = &#39;http://agorbatchev.typepad.com/pub/sh/2_1_364/scripts/clipboard.swf&#39;;
SyntaxHighlighter.all();
</script>


5.Now for applying this to your code just paste the code in between the following code:

<pre class="brush: BRUSH-NAME">

Paste Your Code Here

</pre>


The "BRUSH-NAME" needs to be changed by the Brush you want to use. Like for example if you want to use xml Brush then change "BRUSH-NAME" with xml. All the code should be Escaped (Visit this Page to make your Code Escaped)

Now some extra features : For Highlighting the code see the following code:

<pre class="brush: xml;highlight: [2,4];">
This Line is Highlighted
This Line is not Highlighted
This Line is again Highlighted
</pre>

To Hide the Toolbar

<pre class="brush: xml; toolbar: false;">

If You observe ,there is no Toolbar

</pre>


Implementing Photoshoot in Blogger

Photoshoot plugin, which requires at least the jQuery version 1.3.2 as the basis of its functionality ,is just 4KB creates a very special big photo shoot effect, by which one can relate to working with a camera. Photoshoot offers some modifiable features to the user like blur and opacity.
Developed by Martin Angelov, Photoshoot plugin for jQuery is very simple to understand and implement

Note:It is recommended that you use this plugin in the Static Pages only because it interferes with the CSS of the Blogger templates. 


.


Steps to Add it to Blogger:

1.Login to the Blogger account


2.Go to the Post/Page you want to add Photoshoot and then go to Edit HTML tab .


3.Now copy the code from below and paste it there.


<link rel="stylesheet" type="text/css" href="http://dl.dropbox.com/u/27675057/photoShoot/styles.css" />

<link rel="stylesheet" type="text/css" href="http://dl.dropbox.com/u/27675057/photoShoot/jquery.photoShoot-1.0.css" />

<script type="text/javascript" src="http://ajax.googleapis.com/ajax/libs/jquery/1.3.2/jquery.min.js"></script>

<script type="text/javascript" src="http://dl.dropbox.com/u/27675057/photoShoot/jquery.photoShoot-1.0.js"></script>

<script type="text/javascript" src="http://dl.dropbox.com/u/27675057/photoShoot/script.js"></script>


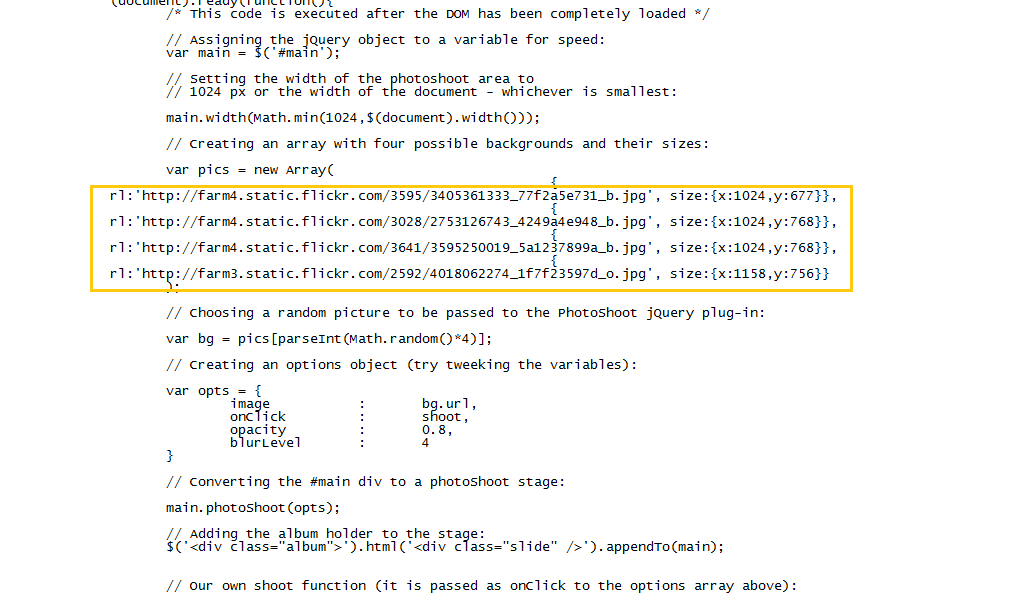
4.To add images into this Plugin you have to open script.js ( Mainly this plugin allows multiple images to be added and the script.js contains the path to all these images .It then randomizes which image load if multiple paths are detected by it)


After opening script.js It would look something like this


In the above image you see that the Orange box contains the links to the images ,you can change these according to your choice


Now to add the image just decalre the following code and the rest will be taken care:


<div id="main">

</div>


5.Now save the Post/Page.

Note: Please Host all the files on free hosting service like DropBox or Blogspot itself!


Another Important thing to note is that all the images used in this tutorial like Next button ,Previous button ,etc are all hosted on Google Code service which are the fastest and most reliable servers on the internet with the least downtime.So you can easily implement this with no hassles for Image Hosting.


© 2009 Blogger Tips 2013 | Powered by Blogger