Showing posts with label Template. Show all posts

Stylify Minimal Responsive Blogger Template


This is a fully responsive and highly optimized template for every kind of Blogger user. It is centered around the concept of Minimalism hence all the unnecessary stuff like Blogger's Default CSS as well as JavaScript have been shunned. It has lightening fast load times and completely complies with Search Engines heading and title standards. This template requires that you have a little bit of knowledge about HTML/CSS so as to do some customization , rest assured that I will be there to help you out in the comments if you face any unsolvable problem.


Download Demo

Features

- Responsive
- Search Engine Optimized
- Lightening fast Page Load Time (98% in Google Page Speed)
- Exclusive Threaded Comment Design
- CSS3 powered Tilted Header
- Supports All Major browsers
- Uses CSS Sprites for less HTML Requests
- Auto Read More Hack
- Pagination option
- Automatic Related Posts under each Post
- CSS3 powered ReadMore Button and Labels
- Electrolize Web Font
- Attractive Share Buttons and Subscribe options
- Author Bio Box
- Ribbon styled Labels on Post Pages
- Print Friendly
- Captivating Post Title design
- Near W3C Valid
- Four Column Footer
- Widget Ready Sidebar with Stacked effect
- Simple Menu and Social Media Buttons
- Automatic Meta Descriptions
- Stacked Paper feel to Post Body
- Appealing Custom 404 Design
- Simple Search Box


Installing the template

- UnZip the Download Pacakge
- Now Go to Blogger Dashboard > Template > Backup/Restore and click Choose File
- Select the XML file from the Unzipped directory
- Then Press Upload and the template is installed


Configuring the various features

- Firstly After Installing the Template Go to Layout and Edit the Blog Posts Widget. Now untick these options and save.


- In the Download package copy all the content of the Widgets.txt file.
  Now create a New HTML/JavaScript widget and place it under the Header widget (Don't forget to press the Save Arrangements button) See image below


In this widget , paste the contents of Widgets.txt file and Save. Now the Search Box , Menu and Social Media Buttons are installed. You will have to manually change the URLs in the Menu as well the Social Media Buttons. The most important URL to change is the action URL of Search box . Make it something like http://www.yourblogURL.blogspot.com/search

- To configure the CSS3 Labels , go to Layout and Edit the Label widget , there Tick Cloud as Display Option and Uncheck the Show number of posts per label


- Now go to the Template > Edit HTML option , Click Proceed and then Tick Expand Widget Templates
Here Search for "Short" . Now remove this whole line and write a small bio about yourself that will be visible under each post. Replace the URL of the Image as well if you like

- Now search for "Stay Connected With Us" , now here change all your Social media URLs accordingly

- Now Search for "home_page" , this will show all the settings related to the Pagination option (Check here for explanation  )

- Now Search for "Your Tag Line" and replace it with your blog's mission or description

- Now Search for "thumbnail_mode" , this will display all the settings related to the Auto Read More Hack

Happy Blogging !

One piece of warning , Other than the Popular Post and Label Widget all the widgets like Blog Archive ,etc don't work . This is because the Deafult JS and CSS files of Blogger have been removed. On the Brighter side Your blog will open like a express train (given that you don't overcrowd it with widgets)

Screenshot


Download Demo


If you liked the template consider donating to us :)

New Blogger Template : Stylify v2

stylify template screenshot small

A new Blogger template named Stylify v2 . It is quite similar to the current design of the blog. The aim was to minimize the use of JavaScript and instead use CSS to meet the needs. It has a simple design and is ultra optimized for Fast Loading (Given that you don't add 1000 extra widget ! ). The default Blogger Style-sheet has been removed to fasten it up even more. The SEO part is also taken care for with automatic Meta Description facility. Its a uncomplicated template with emphasis on Speed and Style.


See Demo


Download

Full Screenshot


stylify v2 template screenshot large


Features

  • Cross browser compatibility 
  • Responsive Design
  • Page Navigation
  • Lazy Loading Share Buttons
  • Its own Related Post widget
  • Stylish commenting system 
  • Attractive Post Title
  • Four column footer
  • Eye-catching Sidebar Design
  • Search Engine Optimized
  • 97% Google Page Speed Score
  • In-built Author Bio Box
  • CSS3 powered Buttons 
  • Breadcrumbs 
  • A fancy Label Widget 
  • Built-in simple Menu
  • Automatic Meta Description for each post 
  • Use of fonts like Salsa and Electrolize


Configurable Features:

This template has a lot of customization possibility. Now I will be explaining how to configure some basic features of this template according to your requirements


1. Menu


configure page list


The menu used is the default Blogger menu. When you will Install the template on your blog , you will see a stray text "Pages" written near the Menu. To remove it , Go to Layouts and Click the Edit button of the Pages Widget . Now in the title field remove everything and Save the Widget.


Extra Note: When you will install the template you will also see a Date above the post title and also the default Blogger sharing buttons . To remove them go to Layouts and edit the Blog Post widget. Untick the Date and Sharing button option and save.


2. Pagination


To change the number of posts to be shown on using pagination find the term postperpage ( Using CTRL+F ) ,There will be a script something like this 

<script type='text/javascript'>
var home_page=&quot;/&quot;;
var urlactivepage=location.href;
var postperpage=3;
var numshowpage=6;
var upPageWord =&#39;Previous&#39;;
var downPageWord =&#39;Next&#39;;
</script>

You can change the number values as you like in the above code.
var postperpage=9; → Changes the no of posts that will show up on clicking any page number.
var numshowpage=3;→ Changes the number of linking to show in the widget


configure blog post blogger layout


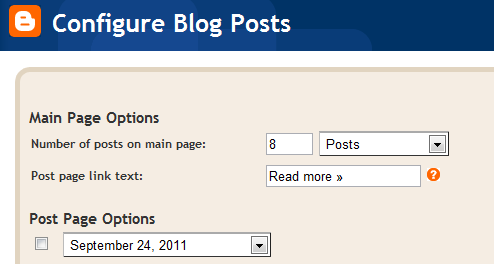
Note: Make sure that you also set the value of Number of Posts on Main Page (Go to Design > Page Elements , Click on Edit option of Blog Post and then Number of posts on main page: ) to same as that of the postperpage value.


3. Border of Image


with without border


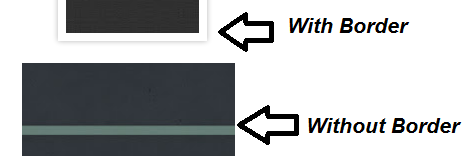
There is a additional feature present to add borders around your image  , To add it just add a class="thumb" in the img tag , as shown below 


<img class="thumb" src="image.png" />


4. Using the CSS3 Button


css3 button


To make a link into a button , just add the class="buttons button" to it , as shown 


<a href="URL" class="buttons button" >A Link<a/>


5. The Author Bio Box


author box code


Under each post a author box is present with your name and some demo text . To change that text go to Edit HTML and tick the Expand Widget Preview box . After that search for Author Bio Box and change the text as per your wish. You can also replace the placeholder image with your own


6. Label Style


configure label blogger layouts


To enable the Label style as see in the demo , go to the Layout and Click the Edit button of the Categories widget. In it much sure to tick Display as Cloud 


See Demo


Download


Whats your opinion about the template ? In case you face any problem or like to suggest any improvement feel free to do so via comments

First Dynamic View Template : Elite Classic

Elite Classic Dynamic View Template

Presenting the First Ever Blogger Dynamic View Template on the Web named Elite Classic. Well its a very interesting thing that even though it has been possible to create Dynamic View Templates for a while now yet no one has created it. Coming to the core functionalities of this template ,it is based on the Classic Dynamic View and Supports the Template Designer fully. The modifications done are all CSS based. The reason for its creation was the monotonous look of the Dynamic Views and no real choice of a different style to choose from in being present.


Demo


Download

Screenshot

Elite Classic

Complete List of Features

-Responsive Design
-Attractive Post Title
-Sticky Sidebar and Menu
-Stylish commenting system design
-CSS3 Gradients powered Header design
-Full support for Template Designer
-Threaded Reply feature 
-90%+ Google Page Speed score 
-AJAX Search Box
-Cross browser compatibility except Opera
-Custom Gadget Dock Design
-Attractive web fonts like HomeMade Apple and SunShiney


How to Upload Elite Classic Template ?

In case you are using Standard Template , then firstly Back Up your template.


For Old Interface Users

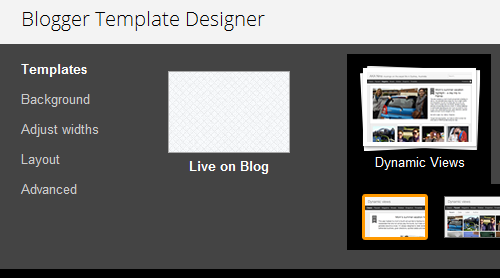
- Go to Design > Template Designer and Under Template sub-heading select the First template under the Dynamic Views Category

Blogger Template Designer

- Now go back to Edit HTML

- Click on Choose File button

- Select the .XML template file Extracted from Zip and click Open button

- Click On Upload button

- In the Keep Widgets Option, Click on DELETE WIDGETS Button

- You are Done!!


For New Interface Users

- Go to Template > Customise and Under Template sub-heading select the First template under the Dynamic Views Category

- Now go back to Template and Click the Backup/Restore button in the Top Right

Backup/Restore button

- Click on Choose File button

- Select the .XML template file Extracted from Zip and click Open button

- Click On Upload button

- You are Done!!


How to Change Fonts and lots of Other things ?

Since this template is Support Blogger Template Designer, so

Go to Design > Template Designer tab (New Interface users go to Template > Customise )

You will find Background Option and Advanced Options.

Play around to get your own unique color Scheme.


Note: In case both these methods don't work , then simply copy the following CSS in the Advanced > Add CSS Section of the Template Designer  of your Dynamic Template:

#gadget-dock {right:0px !important;}
.title a:hover {text-decoration:none !important; }

.header-bar{/* IE10 */
background-image: -ms-linear-gradient(top, #FFFFFF 0%, #C6AEC7 100%) !important;

/* Mozilla Firefox */
background-image: -moz-linear-gradient(top, #FFFFFF 0%, #C6AEC7 100%) !important;

/* Opera */
background-image: -o-linear-gradient(top, #FFFFFF 0%, #C6AEC7 100%) !important;

/* Webkit (Safari/Chrome 10) */
background-image: -webkit-gradient(linear, left top, left bottom, color-stop(0, #FFFFFF), color-stop(1, #C6AEC7)) !important;

/* Webkit (Chrome 11+) */
background-image: -webkit-linear-gradient(top, #FFFFFF 0%, #C6AEC7 100%) !important;

/* Proposed W3C Markup */
background-image: linear-gradient(top, #FFFFFF 0%, #C6AEC7 100%) !important;
-moz-box-shadow: 0 0 0px 0px transparent !important;
-ms-box-shadow: 0 0 0px 0px transparent !important;
-o-box-shadow: 0 0 0px 0px transparent !important;
-webkit-box-shadow: 0 0 0px 0px transparent !important;
box-shadow: 0 0 0px 0px transparent !important;}

#header .header-drawer.sticky {top:65px !important;}

#header .header-drawer {-moz-box-shadow: 0 0 0px transparent !important;
-ms-box-shadow: 0 0 0px transparent !important;
-o-box-shadow: 0 0 0px transparent !important;
-webkit-box-shadow: 0 0 0px transparent !important;
box-shadow: 0 0 0px transparent !important;}

.viewitem-panel {border-top: solid 0px transparent !important; }

.comment-content{white-space: pre-wrap;width: 95%;word-wrap: break-word;}
.comments .comments-content .comment {background: white;position: relative;-webkit-border-radius: 0px 100px 120px;-moz-border-radius: 0px 100px 120px;-o-border-radius: 0px 100px 120px;border-radius: 0px 100px 120px;padding:5px;}
.blogger-comments .comments-content {background:White !important;}
span.comment-actions, .continue {width:120px;background: #F1F1F1;border-radius: 20px 20px;-moz-border-radius: 20px 20px;-webkit-border-radius: 20px 20px;-o-border-radius: 20px 20px;text-align:center;font-weight:bold;text-decoration:none !important;}
span.comment-actions:hover, .continue:hover {background: #EBDDE2;text-decoration:none !important;}
.secondary-text{padding: 6px 12px 6px;text-decoration:none !important;}
.comments .comment .comment-actions a:hover{text-decoration:none !important;}
.comment-replies span div ol div li span {display:none !important;}
.comments .thread-toggle {background: #F3F3F3;border-radius: 20px;-webkit-border-radius: 20px;-moz-border-radius: 20px;-o-border-radius: 20px;padding: 6px 12px 6px;font-weight: bold;}
.comments .thread-toggle:hover {background: #EBDDE2;}
.comments .comment-block {padding: 11px !important;margin-left: 48px;position: relative;left: 60px;background:#F1F1F1;border-radius: 10px;-webkit-border-radius: 10px;-moz-border-radius: 10px;-o-border-radius: 10px;width: 400px;}
.comments .avatar-image-container img , .comments .avatar-image-container img {overflow:visible !important;width:40px !important;max-width:40px !important;}
.blogger-comments .comments-content .comment-replies {background:white !important;}
.comments .avatar-image-container {width:40px !important;background: #F1F1F1;padding: 5px;border-radius: 100px;}
.avatar-image-container img,.avatar-image-container a img, .avatar-image-container {border-radius:20px;position:relative;height:40px;width:40px;background-clip:padding-box;}
#gadget-dock {right:0px !important;}
#header .header-drawer.sticky {top:65px !important;}
.blogger-comments .comments-content .comment {border-bottom: 1px solid White;!important;}
.comments .avatar-image-container {max-height:50px !important;}
.comments .comments-content .comment-header {width: 450px;background:#F1F1F1;position: relative;left: -73px;}
.comments .comments-content .user {font-style: normal;font-weight: bold;position: relative;left: 80px;}
.comments .comments-content .datetime {position: absolute;left: 270px;}
.comment-thread ol div.continue {display:none !important;}

.viewitem-content { background-color: #EBDDE2!important;
border-radius:120px !important;-webkit-border-image:url('http://www.blogger.com/img/blank.gif') !important;border-image:url('http://www.blogger.com/img/blank.gif') !important;-moz-border-image:url('http://www.blogger.com/img/blank.gif') !important;-o-border-image:url('http://www.blogger.com/img/blank.gif') !important;-ms-border-image:url('http://www.blogger.com/img/blank.gif') !important;}
.article .article-header .title {background-color: #EBDDE2!important;font-size: 30px !important;}
.article .article-content img:not(.deferred) {border: 8px solid transparent;
-webkit-box-shadow: 0 0 8px rgba(0, 0, 0, 0.3);
-moz-box-shadow: 0 0 8px rgba(0, 0, 0, 0.3);
box-shadow: 0 0 8px rgba(0, 0, 0, 0.3);
-webkit-background-clip: padding-box;-webkit-border-image:url('http://www.blogger.com/img/blank.gif') !important;border-image:url('http://www.blogger.com/img/blank.gif') !important;-moz-border-image:url('http://www.blogger.com/img/blank.gif') !important;-o-border-image:url('http://www.blogger.com/img/blank.gif') !important;-ms-border-image:url('http://www.blogger.com/img/blank.gif') !important;
-moz-background-clip: padding-box;
background-clip: padding-box;}


.gadget-icons {background-color:salmon !important;}
#gadget-dock {background-color: transparent !important;}
.gadget-title {background-color: gold !important;}

.gadget-selected .gadget-title {
background-color: gold !important;
border-radius: 0px 0px 1000px 1000px !important;
text-align: center !important;
}

.gadget-selected .gadget-icons ,.gadget-content ,.gadget-container, .gadget-selected.gadget-dock-overflow-bottom .gadget-container {
background-color: yellowGreen !important;
}


li.item {
background-color: #EBDDE2!important;
-moz-border-image: url('http://www.blogger.com/img/blank.gif') 2 2 2 2 / 2px 2px 2px 2px repeat !important;
border-radius:120px !important;-webkit-border-image: url('http://www.blogger.com/img/blank.gif') !important;border-image: url('http://www.blogger.com/img/blank.gif') !important;-o-border-image: url('http://www.blogger.com/img/blank.gif') !important;-ms-border-image: url('http://www.blogger.com/img/blank.gif') !important;
}
#header .header-drawer {background-color: #C6AEC7 !important;border-radius: 0px 0px 20px 20px !important;}
.ss,.blogger-gear , .feedback , .Flipcard, .Magazine, .Mosaic, .Sidebar, .Snapshot, .Timeslide, .Classic, #views {display: none !important;}
#header #pages::before {
border-left: solid 1px transparent !important;}


#header .tabs li {font-size:20px;}

.entry-title { word-wrap: break-word !important;

padding: 0 25px;
height: 40px;

color: #301607;

background-color: #c94700;
background-image: -webkit-gradient(linear, left top, left bottom, from(#c94700), to(#b84100));
background-image: -webkit-linear-gradient(top, #c94700, #b84100);
background-image: -moz-linear-gradient(top, #c94700, #b84100);
background-image: -ms-linear-gradient(top, #c94700, #b84100);
background-image: -o-linear-gradient(top, #c94700, #b84100);
background-image: linear-gradient(top, #c94700, #b84100);

border-bottom: 1px solid rgba(255, 255, 255, 0.3);

position: relative;
float: left;
clear: left;

font-size: 32px;
line-height: 40px;
text-shadow: 1px 1px 0 rgba(255, 255, 255, 0.3);

border-bottom-right-radius: 20px 5px;
}

.entry-title:after {
content: "";
display: block;
width: 40px;
height: 0px;

position: absolute;
right: 0;
bottom: 4px;
z-index: 20;

border-bottom: 80px solid #de6625;
border-right: 80px solid transparent;

-webkit-transform: rotate(90deg);
-webkit-transform-origin: right bottom;
-moz-transform: rotate(90deg);
-moz-transform-origin: right bottom;
-o-transform: rotate(90deg);
-o-transform-origin: right bottom;
-ms-transform: rotate(90deg);
-ms-transform-origin: right bottom;
transform: rotate(90deg);
transform-origin: right bottom;
}

.entry-title:before {
content: "";
display: block;
width: 20px;
height: 0px;

position: absolute;
right: 0;
bottom: 4px;
z-index: 10;

border-bottom: 80px solid rgba(0, 0, 0, 0.3);
border-right: 80px solid transparent;

-webkit-transform: rotate(80deg);
-webkit-transform-origin: right bottom;
-moz-transform: rotate(80deg);
-moz-transform-origin: right bottom;
-o-transform: rotate(80deg);
-o-transform-origin: right bottom;
-ms-transform: rotate(80deg);
-ms-transform-origin: right bottom;
transform: rotate(80deg);
transform-origin: right bottom;
}

.entry-title:after {
width: 0px;
height: 40px;

position: absolute;
right: -160px;

border-left: 80px solid #de6625;
border-bottom: 80px solid transparent;

-webkit-transform: none;
-moz-transform: none;
-o-transform: none;
-ms-transform: none;
transform: none;
}
.hfeed {margin-top:50px;}
#header .header-bar .title h1 {font-size:39px !important;}

.article .article-content , .viewitem-panel .article {background-color: #EBDDE2 !important}


Feel free to share your opinion about this template and any problems that you face while implementing it

Demo


Download

New Blogger Template : Videofication

This is my 4th template. I tried to make it a bit different. The idea was to make a YouTube type thing in Blogger. It has simple layout and some other functionality like Rater widget, Threaded Comment,etc. Here I wanted to mention that the base template and JavaScript was originally made by BloggerzBible ,I just did some modifications to the JavaScript and looks.

Videofication Blogger Template image


Demo


Download


Complete List of Features


-Fixed Design
-Cross browser compatibility 
-Page Navigation
-Widgets ready sidebar
-Stylish commenting system
-Attractive Post Title 
-CSS3 powered Header design
-Three column footer
-Threaded Reply feature for Blogger Comment system
-80%+ Google Page Speed score 

-Integrated Search Box
-CSS3 shadows around post area and footer
-Attractive web fonts like Jim Nightshade and Chelsea Market
-RocketBar jQuery Menu
-Inbuilt 5 star rating widget for each post


How to configure the features:

1.Menu
The menu widget is included separately in the Download Package. Just copy the contents of the widget into the HTML / JavaScript widget present below the Header. As you will observe , there will be two distinct menus present in the widget. The upper one is the one that will appear when you open the page the other one will appear while you scroll the page. Make the changes accordingly to them.


2.Page Navigation
To change the number of posts to be shown on using pagination find the term postperpage ( Using CTRL+F ) ,There will be a script something like this

<script type='text/javascript'>
var home_page=&quot;/&quot;;
var urlactivepage=location.href;
var postperpage=3;
var numshowpage=6;
var upPageWord =&#39;Previous&#39;;
var downPageWord =&#39;Next&#39;;
</script>


You can change the number values as you like in the above code.
var postperpage=9; → Changes the no of posts that will show up on clicking any page number.
var numshowpage=3;→ Changes the number of linking to show in the widget


Note: Make sure that you also set the value of Number of Posts on Main Page (Go to Design > Page Elements , Click on Edit option of Blog Post and then Number of posts on main page: ) to same as that of the postperpage value.


3. Adding Videos
To add videos to a post. Just enclose the Youtube URL within [youtube]..[/youtube]


For example: [youtube]http://www.youtube.com/watch?v=gKWNUyTGqss[/youtube]


Make sure this is included in the top of the post. After that you can write your post the usual way. In the homepage you will see a automatically generated thumbnail of the video along a small extract from the post.


This is a YouTube template, so no other video sharing website URL will work.


4. Recent Post Widget
It is included separately in the Download package and you can just copy-paste it into a HTML/JavaScript widget .It will work smoothly. To do any changes in it, here are the following available option:


var numposts = 3; 
var showpostthumbnails = true; 
var displaymore = true; 
var displayseparator = true; 
var showcommentnum = true; 
var showpostdate = true; 
var showpostsummary = true; 


I believe you will like the template and feel free to ask about any difficulties you face while using the template.

Demo


Download

New Blogger Template : Directus

Hi everybody , this is a new Blogger template. The name might be a little unheard , but it means Simple in Latin. I have used a lot of CSS3 essentially shadows and border-radius property. The header design is quite similar to the Dynamic Views template and it is Responsive like the previous template (No horizontal scroll-bar till 580px). It has threaded comments but now with Circular avatar picture. The colors used are overall of lighter shade and give a kind of soothing effect.


Demo


Download


Complete List of Features


-Responsive design (No horizontal scrollbar till 580px)
-Cross browser compatibility 
-Page Navigation
-Widgets ready sidebar
-Its own Related Post widget
-Stylish commenting system with Circular Avatars
-Attractive Post Title with hover and active states
-jQuery and CSS3 powered Header design
-Three column footer
-Threaded Reply feature for Blogger Comment system
-Eye-catching Sidebar Design
-Search Engine Optimized
-Near W3C Valid
-95%+ Google Page Speed score 

-Integrated Menu and Search Box
-CSS3 shadows around post area
-Inbuilt FB and Twitter Icon
-Attractive web fonts like Trade Winds and Playball
-Appealing "Read More" button with hover and active states
-Modified input and select fields
-Responsive Images

How to configure the features:

1.Menu
The menu is just below the Header and automatically displays all the pages of the blog. Firstly when you install it on your blog, go to  Layout (or Page Elements) and remove the title of that widget. The title should remain blank for it to display the pages correctly. In case you are using the New interface then you can easily add custom links to this menu by going to Pages in the Dashboard and then choosing Web Address in the New Page option.


2.Page Navigation
To change the number of posts to be shown on using pagination find the term postperpage ( Using CTRL+F ) ,There will be a script something like this

<script type='text/javascript'>
var home_page=&quot;/&quot;;
var urlactivepage=location.href;
var postperpage=3;
var numshowpage=6;
var upPageWord =&#39;Previous&#39;;
var downPageWord =&#39;Next&#39;;
</script>


You can change the number values as you like in the above code.
var postperpage=9; → Changes the no of posts that will show up on clicking any page number.
var numshowpage=3;→ Changes the number of linking to show in the widget


Note: Make sure that you also set the value of Number of Posts on Main Page (Go to Design > Page Elements , Click on Edit option of Blog Post and then Number of posts on main page: ) to same as that of the postperpage value.


3.Enabling Reply option for the comments
The the reply option in the comment will have to enabled . Just search for the term blogid= ( using CTRL+F ) with "Expand Widget Preview" option ticked. You will see something like this "blogID=XXXXXXXXXXXX" replace this XXXXXXXXXXX number with your Blog's ID. [To find your Blog's ID just Open Design Tab and in the Address bar of your browser there will be a very long number , just paste that here]


4. Deleting Navbar and Attribution widget
If you are using Simple templates or any other default Blogger template, Then it might happen that the NavBar and Attirbution widget would be visible in the sidebar just after installing the template. To remove these widgets you will have to Edit HTML of the Blog and search for something like "Navbar" & "Attribution". These too things you will find inbetween b:widget tags . Remove everything including these tags which will look something like this


<b:widget id='Navbar' >
..................
..................
</b:widget>


Note: Interestingly this can only be done in the Old Blogger Interface. In case you try it in new Blogger interface ,it will always crash.


5. Header
The header text can be changed easily using the Header widget present in the Page Elements (or Layouts ). If you want to add a background image ,then search for the following term .header{ and you will see something like this


.header{background-image:-moz-linear-gradient(center top, rgba(255, 255, 255, 0.1), rgba(100, 100, 100, 0.05));background-image:-webkit-gradient(linear, left top, left bottom, from(rgba(255, 255, 255, 0.3)), to(rgba(255, 255, 255, 0.05)));background-attachment:scroll;background-color:rgba(243, 243, 243, 1);-moz-box-shadow:0 0 5px 0px rgba(0, 0, 0, 0.3);-ms-box-shadow:0 0 5px 0px rgba(0, 0, 0, 0.3);-o-box-shadow:0 0 5px 0px rgba(0, 0, 0, 0.3);-webkit-box-shadow:0 0 5px 0px rgba(0, 0, 0, 0.3);box-shadow:0 0 5px 0px rgba(0, 0, 0, 0.3);height:90px !important;position:absolute;top:0px !important;left:0px !important;width:100% !important;z-index:1001;display:block;-webkit-box-shadow:0px 3px 30px rgba(0, 0, 0, 0.1);-moz-box-shadow:0px 3px 30px rgba(0, 0, 0, 0.1);box-shadow:0px 3px 30px rgba(0, 0, 0, 0.1);}

Remove all the background- attributes from the above code and replace it with a single attribute containing the URL of the background ,something like this:


.header{background: url(IMAGE-URL);-moz-box-shadow:0 0 5px 0px rgba(0, 0, 0, 0.3);-ms-box-shadow:0 0 5px 0px rgba(0, 0, 0, 0.3);-o-box-shadow:0 0 5px 0px rgba(0, 0, 0, 0.3);-webkit-box-shadow:0 0 5px 0px rgba(0, 0, 0, 0.3);box-shadow:0 0 5px 0px rgba(0, 0, 0, 0.3);height:90px !important;position:absolute;top:0px !important;left:0px !important;width:100% !important;z-index:1001;display:block;-webkit-box-shadow:0px 3px 30px rgba(0, 0, 0, 0.1);-moz-box-shadow:0px 3px 30px rgba(0, 0, 0, 0.1);box-shadow:0px 3px 30px rgba(0, 0, 0, 0.1);}

6. Some other features


>>To add border across images add a class="thumb" in the img tag


>>To make images with rounded edges , add a class="image" in the a tag surrounding the img tag.


>>The images are scaled down in smaller screens ,never exceeding the white post area


>> If you want to add buttons like the Read More one ,you can achieve it b adding a class="button" in a a tag something like this:


<a href="URL" class="button" >Button</a>


These also have option to add a small symbol just before them ,like for example a arrow


<a href="URL" class="next button" >Button</a>


For complete list of options check this URL

This template could not have been possible without Codrops (Header Text) ,RDT (Buttons) and CSS-Tricks (a lot of things)

I hope you like the template and don't hesitate to the ask about any problems you face while using the template.


Demo


Download

New Blogger Template : Standardized

Standardized Blogger Template ImageIts been nearly 3 months since the Stylify template. Now I am presenting my second template named Standardized. It has its roots in responsive design and has some awesome features like threaded Reply comment & eye-catching Header design. A mix of design and usability.


See Demo


Download


Initially I started making this template with the goal to make it W3C valid. Thats where the name Standardized came from, the one that follows standards. Near the end of process I hit a really nasty cross-browser issue (a.k.a. IE sucks) , and by just 1 error this template remained from obtaining that "VALID" markup title. This is just version 1 and better onces are to come. The highlight of this template is the Nested Reply comment feature inside the Blogger comment system itself! A really amazing hack...


Features
-Responsive design (No horizontal scrollbar till 580px)
-Cross browser compatibility 
-Page Navigation
-Widgets ready sidebar
-Its own Related Post widget
-Stylish commenting system with comments having gradient background style
-Attractive Post Title
-jQuery and CSS3 powered Header design
-Four column footer
-Threaded Reply feature for Blogger Comment system
-Eye-catching Sidebar Design
-Search Engine Optimized
-Near W3C Valid
-90%+ Google Page Speed score

How to configure some of the Features:


1.Menu
The code for the menu widget has been separately included in the Download Package. Rather than integrating it into the Template and making it difficult to edit ,I have included it separately. All the styles are included beforehand just the Links have to be copied in. The menu should be in the section of the Header (being just below the Header).


2.Page Navigation
To change the number of posts to be shown on using pagination find the term postperpage ( Using CTRL+F ) ,There will be a script something like this

<script type='text/javascript'>
var home_page=&quot;/&quot;;
var urlactivepage=location.href;
var postperpage=3;
var numshowpage=6;
var upPageWord =&#39;Previous&#39;;
var downPageWord =&#39;Next&#39;;
</script>


You can change the number values as you like in the above code.
var postperpage=9; → Changes the no of posts that will show up on clicking any page number.
var numshowpage=3;→ Changes the number of linking to show in the widget


Note: Make sure that you also set the value of Number of Posts on Main Page (Go to Design > Page Elements , Click on Edit option of Blog Post and then Number of posts on main page: ) to same as that of the postperpage value.


3.Enabling Reply option for the comments
The the reply option in the comment will have to enabled . Just search for the term blogid= ( using CTRL+F ) with "Expand Widget Preview" option ticked. Below it you will see "blogID=XXXXXXXXXXXX" replace this XXXXXXXXXXX number with your Blog's ID. [To find your Blog's ID just Open Design Tab and in the Address bar of your browser there will be a very long number , just paste that here]


4.Social Media Buttons and Search Box
The Download package also contains code for these two widgets. Either you can put them in separate widgets or put them together. In case you put them together then make sure the search box is above the icons and also include it in the section just below the Header (In Page Elements/Layouts). The widget containing the Social Media Icon should always be in this section.


This template came in the wake of many users complaining about different problems in the previous template.


Liked My Work ?
 
© 2009 Blogger Tips 2013 | Powered by Blogger