jQuery Hacks : Hiding Links inside Comments

span stopFor the past few months I have been dealing with a lot of spam in the comment section. The Blogger's inbuilt filter has stopped more than 6000 spam comments but still some slipped by . Due to this very reason I had to close the Anonymous option for commenting. But this didn't solve the problem and people with Blogger profile started to spam as well . So I have come up with a simple jQuery powered hack that hides any clickable link and just displays its text.


Demo
Try adding links in the comment below

Code
<script src='https://ajax.googleapis.com/ajax/libs/jquery/1.8.3/jquery.min.js'/>
<script>

$('.comment-content a[rel$=nofollow]').replaceWith(function(){return ($(this).text());});

</script>

Add it just before the </body> tag in the Edit HTML . In case you have already included the jQuery library , then add the code starting from Line 2 onwards.

If you want to completely remove the links from the comments , then use this code instead

<script src='https://ajax.googleapis.com/ajax/libs/jquery/1.8.3/jquery.min.js'/>
<script>

$('.comment-content a[rel$=nofollow]').hide());

</script>


This works for the Threaded Comments in Blogger , incase you want to make it work for the old Comments in Blogger , then the code is as follows
<script src='https://ajax.googleapis.com/ajax/libs/jquery/1.8.3/jquery.min.js'/>
<script>

$('.comment-body p a[rel$=nofollow]').replaceWith(function(){return ($(this).text());});

</script>


Hope this helps you in curbing the spam in your comment section and feel free to share this simple trick with your friends

Blog Archive links Collapsed by Default Hack

blog archive widget hack

If you are using the Hierarchy style for your Blog Archive widget then you must have faced the problem of auto expansion of drop-down list of a particular month which is currently in the calendar or to which the opened post belongs. This simple hack solves that problem by making all the nodes in the hierarchy to be collapsed by default(As seen in the above picture ). This can be simply added by the One Click Installer or manually.

Demo


Prerequisites for this to Work
Before you apply this remember that you have to have a Blog Archive Widget present and the Style has to be set to Hierarchy (as shown in picture below )

blog archive widget config blogger


Applying this to your Blog

To add using One Click Installer Method


Or just add the following Code in your Blog (preferably before the </body> tag in the Edit HTML of the Template tab )

<script src="https://ajax.googleapis.com/ajax/libs/jquery/1.8.3/jquery.min.js"></script>
<script>
if ( $('.archivedate').hasClass('expanded') )
{
$('.archivedate').removeClass('expanded');
$('.archivedate').addClass('collapsed');
}
</script>


What this code does
It firstly checks if a element having class name "archivedate" also has a class "expanded" present in it. If this turns out to be true then it removes the "expanded" class and adds a class named "collapsed" .

If you face any problem implementing it in your blog then feel free to ask via comments

Auto Pop Email Subscription Widget for Blogger

Auto Pop Email subscription widget for Blogger blogs. A easy way to get more email subscribers. This widget subtly presents a popup for subscribing for Email updates just after a specific trigger element is scrolled through. This trigger element can be changed as per your requirements. By default it is set to the comment section. So when you scroll past the comment section of your blog it will popout from the top. You can add this widget into your blog via the widget generator or manually

Demo


Widget Generator


Note: Currently this will not work . For updates check Blogger Forum

Or you can use the manual method


For that just copy the code from below
<style type='text/css'> /*<![CDATA[*/ #slider{     position:fixed;    top:-125px;    right:0px;    height:120px; width:100%;    background-color:#fff;    opacity:0.98;    -moz-box-shadow:    0px 0px 8px #ccc;    -webkit-box-shadow: 0px 0px 8px #ccc;    box-shadow:         0px 0px 8px #ccc;   }   .syb_footer{margin-top:-10px;font-size:0.8em;} #slider #slider-shell{    width:800px; height:110px;margin:10px auto;    position:relative;   }   #slider #slider-tab{position:absolute; bottom:0px; right:0px;    width:400px; text-align:right; padding-right:10px;    cursor:pointer; font-size:0.6em;   } #syb_embed_signup{ background:#fff; clear:left; font:14px Helvetica,Arial,sans-serif; }#syb_embed_signup form {display:block; text-align:left; padding:10px 0 10px 3%}#syb_embed_signup h2 {font-weight:bold; padding:0; margin:15px 0; font-size:1.4em;}#syb_embed_signup input {border:1px solid #999; -webkit-appearance:none;}#syb_embed_signup input[type=checkbox]{-webkit-appearance:checkbox;}#syb_embed_signup input[type=radio]{-webkit-appearance:radio;}#syb_embed_signup input:focus {border-color:#333;}#syb_embed_signup .button {clear:both; background-color: #aaa; border: 0 none; border-radius:4px; color: #FFFFFF; cursor: pointer; display: inline-block;font-size:15px; font-weight: bold; height: 32px; line-height: 32px; margin: 0 5px 10px 0; padding:0; text-align: center; text-decoration: none; vertical-align: top; white-space: nowrap; width: auto;}#syb_embed_signup .button:hover {background-color:#777;}#syb_embed_signup .small-meta {font-size: 11px;}#syb_embed_signup .nowrap {white-space:nowrap;}     #syb_embed_signup .clear {clear:none; display:inline;}#syb_embed_signup label {display:block; font-size:16px; padding-bottom:10px; font-weight:bold;}#syb_embed_signup input.email {padding:8px 0; margin:0 4% 10px 0; text-indent:5px; width:58%; min-width:130px;}#syb_embed_signup input.button {width:35%; margin:0 0 10px 0; min-width:90px; }  /*]]>*/ </style><script type='text/javascript' src='https://ajax.googleapis.com/ajax/libs/jquery/1.6.4/jquery.min.js'></script><div id='slider' style='top: -108px;'><div id='slider-shell'><div id='syb_embed_signup'><form action='http://feedburner.google.com/fb/a/mailverify?uri=' id='syb-embedded-subscribe-form' method='post' onsubmit='window.open(&quot;http://feedburner.google.com/fb/a/mailverify?uri=&quot;, &quot;popupwindow&quot;, &quot;scrollbars=yes,width=550,height=520&quot;); return true' target='popupwindow'><label for='syb-EMAIL'>Get my next article in your inbox!</label><input class='email' id='syb-EMAIL' name='email' placeholder='Email Address' required='required' type='email' /><div class='clear'><input class='button' id='syb-embedded-subscribe' style='background-color: #0066cc;' type='submit' /></div></form><div class='syb_footer'><small><a id='syb_email_link' target='_blank' href='http://www.stylifyyourblog.com/2012/12/auto-pop-email-subscription-widget-for.html?utm_src=SYB_email' style='padding: 1px 0px 0px 19px;text-decoration:none;'><img src='http://img1.blogblog.com/img/blank.gif' alt='Email Subscription Widget for Blogger' style='border:none' /></a>Powered By <a href='http://www.stylifyyourblog.com/?utm_src=SYB_email' target='_blank' title='Blogger Widgets and Gadgets'>Stylify Widgets</a></small></div></div><div id='slider-tab'>Wait! I want to get email updates, bring that back...</div></div></div><script type='text/javascript'>$(document).ready(function(){function isScrolledDown(a){var b=$(window).scrollTop();var c=b+$(window).height();var d=$(a).offset().top;var e=d+$(a).height();return(e<=c)}function isScrolledUp(a){var b=$(window).scrollTop();var c=b+$(window).height();var d=$(a).offset().top;var e=d+$(a).height();return(d-200>=c)}function bringSliderOut(){$(f).animate({top:0},'fast');$('#slider-tab').text('hide this...')}function bringSliderIn(){$(f).animate({top:-108},'fast');$('#slider-tab').text('Wait! I want to get email updates, bring that back...')}var f=$('#slider');var g=$('#comments');var h=false;var i=false;$('#slider-tab').click(function(){if(!i){bringSliderOut();i=true}else{bringSliderIn();i=false}});$(window).scroll(function(){if(isScrolledUp(g)){if(h){bringSliderIn();h=false;i=false}}else if(isScrolledDown(g)){if(!h){bringSliderOut();i=true;h=true}}})});  </script>

Now just search for uri= and add your FeedBurner ID after that.

If you face any problems in implementing it , please feel free to ask via the comments

Thanks to Hartley Brody for the idea

This post is sponsored by PaceButler a service to sell your cell phone. Don't forget to check Pacebutler Review before opting for their services.

For Sponsored Post Opportunity Contact Me

How To Create a Timeless Blog

timelessNews stories and big headlines may attract attention to your blog quickly, but they go out of date quickly as well. On the other hand, the information contained in a "helpful tips" style blog lasts longer and is more likely to bring in timeless benefits to blog owners. Listed below are 4 helpful tips on how to create a timeless blog.


Avoid Mentioning Specific Brands or Versions

Of course, if you have a technology blog, this probably won't apply to you, but for all others, take care not to reference specific brands of products or specific versions of products. This advice applies most especially to technological gadgets. While you may feel tempted to review the latest version of the hottest gadget out on the market to date, rest assured that your reference will become outdated quickly, most likely as soon as the next version comes out. When visitors see your blog referencing outdated products, your content seems less relevant.

Avoid Referencing News Stories, Headlines, Political Figures or Celebrities

stack of newspaperAgain, these kinds of stories will bring visitors to your blog in an Internet stampede. Unfortunately, however, it works against you in the long run. You want to create content that's "evergreen" - always fresh - which won't go out of date within a few days, weeks or months. Before a presidential election, for example, news stories about the candidates draw an unprecedented amount of attention. A year and a half into the president's term, however, no one's going to be reading those stories. The same goes with celebrity news and other headline news stories. At the time the stories occur, everyone's scouring the Internet to find out what's going on. A month later, you'll be hearing the sound of crickets emanating from your blog because no one's reading stories that aren't relevant anymore.

Focus on Popular and Universal Themes

When you're coming up with "evergreen" content for your blog, think about popular and universal themes. Cultivate an understanding of what kind of information people always seems to be searching for. Some good timeless business-oriented themes include how to manage effectively and how to deal with stress in a positive way. People have talked about these ideas since the modern business environment came into existence, and it's likely they'll keep talking about them as long as businesses exist.

Give Advice that's Useful Regardless of Year or Season

adviceIf you want your blog to attract attention no matter what year or season it is, give advice that readers can use any time. Good examples for a home-oriented blog include effective ways to clean without chemicals and why pet owners should spay or neuter. While this information certainly would never get called cutting-edge, and it will take longer to attract readers than hot news stories, timeless information is much more likely to help you cultivate a readership and optimize your blog for SEO.

Conclusion

When creating content for your blog, resist the temptation to recycle the hottest stories on the web. Instead, work on making content that will continue to attract readers after the big news story of the week gets replaced with next week's headline. Timeless content works more effectively in the long run to build an audience and help your blog rank high with search engines.


If you would like to find out which host a site is using, you can use the WhoIsHostingThis search engine. Erik Gaandt is a freelance tech writer and SEO enthusiast. He understands the importance web hosting has on a sites search engine rank. He enjoys sharing his insights on various blogs.

The All new Google+ Followers Widget

Google+ Followers widget
Just a couple of hours ago Blogger launched the Google+ Follower widget. Build on the lines of the older Friend Connect Follower widget , it has a Follow button accompanied with the faces of your Google+ Followers. It is now available in the Add a Gadget menu and can be added to your blog with just a single click. The widget currently has no configurable options but this will surely change as future enchantments are made. This can be seen as another step in the direction of integrating Google+ with Blogger. Now lets see some of the other facts related to this widget


Before adding this widget you will have to connect your blog to Google+ if you haven't already done it

To connect your Google+ profile with Blogger

 1. To do that just go the Google+ tab in your Blog's dashboard and click the Upgrade to Google+ button

Upgrade to Google+


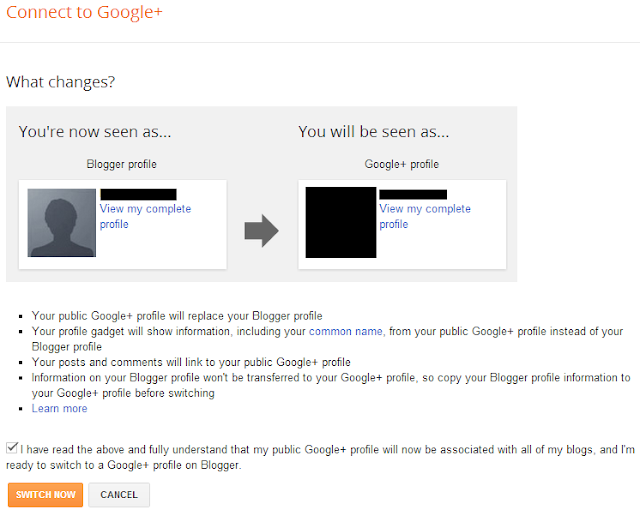
2. You will be presented a screen where you will have to tick the check-box and click the Switch Now button

connect with google+ blogger

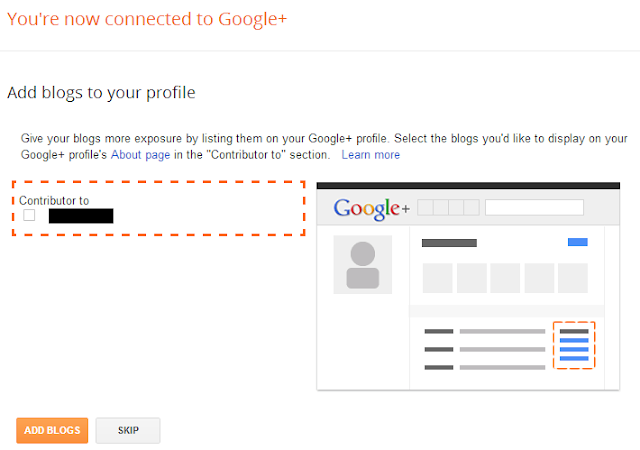
3. Now you have a choice whether you want to add the blogs you contribute to the About section of your Google+ profile. Whatever you choose , either skip or add the blogs to your profile

add your blogs

4. This completes the integration of your Blogger account with Google+


To add the Google+ Follower widget

1. Go to the Layout tab

Blogger Layout tab


2. Click the Add a Gadget button ( preferable in the Sidebar )

3. Now select the Google+ Followers Widget and click the Save Button

Google+ Followers


4. Check your blog and you will see the widget in your sidebar now .

Hope this tutorial helped and don't forget to follow us on Google+ via the Google+ Follower widget present in the sidebar

Check more about this story on Blogger's official blog - Grow your audience with the Google+ followers gadget

6 Ways To Keep Your Blog Interesting

bored teenager
As you have created a blog for yourself and considering blogging, you are needed to ensure that you keep your blog interesting which will help you get more and more visitors preferably on-going visitors. In this post, I am to list down the 6 different ways to keep your blog interesting. Continue reading and figure out if your blog is good enough or not.


1. Identify The Purpose Of Your Blog

First and foremost step towards keeping your blog interesting is your primary objective behind creating your blog. It does not matter if your aim is to share valuable content or to generate traffic, once you are clear about the purpose of your objective, you need to keep moving forward and work hard to achieve success.

2. Your Blog’s Content

A blog happens to be interesting, when it is sharing worthy and useful information to its readers. In short, you; being the author of your blog will take your readers along. You need to make sure that you have unique and original content on your blog by covering exclusive topics.

3. Choosing A Topic

break through the clutter
Choosing a topic to write on is certainly a tough task as you need to ensure that the topic you choose is interesting and exclusive to your readers. Moreover, you can also try writing about the latest market and industry trends which are yet to be discovered by others. You can even allow guest posts on your blog, and bloggers will help you contribute to the content of your blog. Also, you can consider the older topics and trends and tailor them according to the recent times. This way your readers will get to read new and interesting information that has been made available on your blog.

4. Design

keys tools animated
While you are spending time to create unique and exclusive content for your blog, you should also spend some time choosing an exceptional design for your blog. it is imperative to avoid adding poor and clumsy designs which eventually leave your visitors searching for what they came for. You must incorporate such a design that prompt the visitors to check your site every now and then for latest updates as they liked the way you already presented your content on the blog. If you are using the WordPress platform, you can select and add several different themes that are available on the WordPress dashboard itself. Also, you can add premium and even free themes which are compatible with the latest WordPress version you are currently using for your blog.

5. Be Consistent

Keep posting on your blog frequently; and let your blog stay alive for your readers. Try to have a target which you must achieve per week. This way you will be able to engage more visitors on your blog.

6. Communicate!

You need to ensure that the content you post on your blog is useful in keeping the interest of your regular readers. Utilize the comment section of your blog to effectively communicate with them, engage your audience and share your ideas. Respond to all the comments that have been posted and do answer their queries if any asked.


Author Bio

Rahul GarewalThis guest post was written by Rahul Garewal, writer and researcher for Minerabatkoder.dk.

Polls in Blogger

microphone to voice your viewsGetting feedback from your readers is the best way to know their opinions and what better way of doing this than by using Polls. Polls make your blog look more interactive and  makes your reader feel as being part of a community. In Blogger there is a inbuilt Poll Gadget which comes with basic options. In this post we will also be discussing poll widgets from Polldaddy & Quipol and their features.


Blogger Poll Gadget 
Demo

To integrate the Blogger's own Polling widget you just have to go to the Layout tab and Click the Add a Gadget button . There select the Poll gadget and you will be presented with the following window


You are provided with the basic option like
- Ability to select the Closing date of your Poll
- Selecting whether users are allowed to mark multiple answers

PollDaddy  Demo
Polldaddy provides a lot of options and it allows you to create Surveys , Quizzes and Rating widgets as well.
For getting started with creating a Poll , just go to Polldaddy.com and register if you haven't already . Now in your Dashboard click the Create a new button and select Poll .

Here the options for customization are many as compared to Blogger gadget , Here are some

- Adding MP3 , pictures accompanying your question
- 6 Polling gadget designs to choose from
- Different options to display results
- Ability to dedicated comment threads
- Repeat voters options

After completing the setup just click the Create Poll button and you will be presented with a code that you can simple copy in a HTML/JavaScript gadget.


Quipol Demo
Just a year old but has taken Polling industry by storm . Its restrictive in a sense because it only allows positive or negative feedback for a question but its design is just mind-blowing and makes make for it.

To create a poll , Firstly signup for Quipol here and then create a new poll . You will be presented with the following screen


Once complete , click the Create this Quipol button and then you will be given a code to add to your blog . Or if you like you can direct your reader to the Quipol-hosted poll

Some of its features are
- A dedicated comment thread for each poll
- Adding images or videos ( Youtube and Vimeo ) with question
- A visually appealing result pie chart
- Facebook/Twitter authentication

A word to round-offs all the services
Feature-Rich - Polldaddy
Awesome Design - Quipol
Native - Blogger's own

These are the polling widgets that I found useful and have shared with you . Feel free to voice your opinion about which you like the most out of them
 
© 2009 Blogger Tips 2013 | Powered by Blogger