 Its been really a while since i was trying to make a template. I am really happy to release my first Blogger template. I have tried to make this template as simple as possible to use. This template is based on the current design of my blog and extensively uses CSS3 and jQuery. Its rich in features and easy to use.
See Demo
Download

After many days of working on this template I am finally happy to present this new blogger template “STYLIFY”. Its my first template and its a simple blogger template with extensive use of CSS3 and jQuery.
Features
- Simple design
- Cross browser compatibility
- Page Navigation
- Widgets ready sidebar
- One click Show/Hide side sharing options
- ShareThis.com Sharing Buttons Pre-Installed
- Its own Related Post widget
- Stylish commenting system with comments having gradient background style
- Attractive Post Title
- Every image has Rounded edges
- jQuery powered "Back To Top" Button
- Four column footer
- Stylish Search Box
- Use of BonBon Buttons
- Reply feature for Blogger Comment system
- Eye-catching Sidebar Design
- Search Engine Optimized
So as you can see the theme is full of features
How To Install this on your Blog:
1. Download the template from the Download Link Above

2. In your Blog, Go to Design > Edit HTML and Then Click on Choose File and after selecting the Downloaded File ,Click on Open . After that Click on Upload.

3. During this process a Dialog-Box will appear asking Whether you want to Delete or Keep Your Widgets. Its up to you to decide. After this the template is installed.
Configurable Features:
1.Navigation

2.Pagination
To change the number of posts to be shown on using pagination find the term postperpage ( Using CTRL+F ) ,There will be a script something like this
<script type='text/javascript'>
var home_page="/";
var urlactivepage=location.href;
var postperpage=3;
var numshowpage=6;
var upPageWord ='Previous';
var downPageWord ='Next';
</script>
You can change the number values as you like in the above code.
var postperpage=9; → Changes the no of posts that will show up on clicking any page number.
var numshowpage=3;→ Changes the number of linking to show in the widget
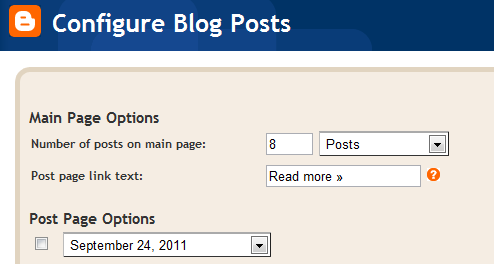
Note: Make sure that you also set the value of Number of Posts on Main Page (Go to Design > Page Elements , Click on Edit option of Blog Post and then Number of posts on main page: ) to same as that of the postperpage value.
3.Rounded Edges of Image
img {
 -webkit-box-shadow: 0px 1px 2px rgba(0, 0, 0, 0.1);
 -moz-box-shadow: 0px 1px 2px rgba(0, 0, 0, 0.1);
 box-shadow: 0px 1px 2px rgba(0, 0, 0, 0.1);
 -webkit-border-radius:4px;
 -moz-border-radius:4px;
 border-radius:4px;
 background-color: transparent;
}

img:hover {
cursor:pointer !important;
filter:alpha(opacity=50);
-moz-opacity: 0.80;
opacity:0.8;
}
If you want you can delete it ,but if you want to use this selectively then I suggest add a .image attribute before img like this.
.image img {
 -webkit-box-shadow: 0px 1px 2px rgba(0, 0, 0, 0.1);
 -moz-box-shadow: 0px 1px 2px rgba(0, 0, 0, 0.1);
 box-shadow: 0px 1px 2px rgba(0, 0, 0, 0.1);
 -webkit-border-radius:4px;
 -moz-border-radius:4px;
 border-radius:4px;
 background-color: transparent;
}

.image img:hover {
cursor:pointer !important;
filter:alpha(opacity=50);
-moz-opacity: 0.80;
opacity:0.8;
}
Now for applying this to any image just add class="image" into that image's HTML code4.Link Nudging
There is a CSS code present in the template for using simple link Nudging . If you want to apply it in blog, then just see the following code:
<div class="css3_nudge nudge">
     <ul >
      <li><a href="#" target="_blank" >BlogLovin</a></li>
      <li><a href="#" target="_blank" >Bloggers</a></li>

     </ul>
</div>
You can see the demo of Link Nudging in the Demo Blog's Sidebar.
5.Floating Sharing Widget
On the post pages there is a Side floating Sharing Widget present on the left side of the Blog. It uses SharThis.com Buttons. To modify it just search for the </body> tag and above it there will be a code like this
<b:if cond='data:blog.pageType == "item"'>
<style>
#pageshare {position:fixed; top:25%; left:5px; float:left; border-radius:5px;-moz-border-radius:5px;-webkit-border-radius:5px;background-color:#f8f8f8;padding:0 0 2px 0;z-index:10;}
#pageshare .sbutton {float:left;clear:both;margin:5px 5px 0 5px;}
.fb_share_count_top {width:48px !important;}
.fb_share_count_top, .fb_share_count_inner {-moz-border-radius:3px;-webkit-border-radius:3px;}
.FBConnectButton_Small, .FBConnectButton_RTL_Small {width:49px !important; -moz-border-radius:3px;/*bs-fsmsb*/-webkit-border-radius:3px;}
.FBConnectButton_Small .FBConnectButton_Text {padding:2px 2px 3px !important;-moz-border-radius:3px;-webkit-border-radius:3px;font-size:8px;}
span.linkopacity {
filter:alpha(opacity=0.1);
-moz-opacity: 0.1;
opacity: 0.1;
-khtml-opacity: 0.1;}
span.linkopacity:hover {
filter:alpha(opacity=100);
-moz-opacity: 1.0;
opacity: 1.0;
-khtml-opacity: 1.0; }
</style>
<div style='margin-left: auto; margin-right: auto;'>
<div id='pageshare'><input class='button' onclick='fade('pageshare', this)' type='button' value='Close'/>
<script>
function fade(div_id, button) {
if(button.value == 'Close') {
$('#' div_id).fadeOut('slow');
button.value = 'Reappear';
}
else {
$('#' div_id).fadeIn('slow');
button.value = 'Close';
}
}
</script>
<br/><br/><span class='st_facebook_vcount' displaytext='facebook'/><br/><span class='st_twitter_vcount' displaytext='tweet'/><br/><span class='st_digg_vcount' displaytext='digg'/><center><span class='st_delicious_vcount' displaytext='save'/><br/><span class='st_stumbleupon_vcount' displaytext='share'/></center></div></div>
<!-- floating page sharers End -->
</b:if>
To change the buttons just get code from the ShareThis website and place it in the above code.
There are two more sets of Share Buttons present in the Blog, one above the Post and the Other Below the Post.
6.Enabling Reply option for the comments
The the reply option in the comment will have to enabled . Just search for the term class='MBT-replycomments' ( using CTRL+F ). Below it you will see "blogID=XXXXXXXXXXXX" replace this XXXXXXXXXXX number with your Blog's ID. [To find your Blog's ID just Open Design Tab and in the Address bar of your browser there will be a very long number , just paste that here]
7.Modifying Header Text
To modify this Go to Design > Edit HTML. Tick the "Expand Widget Template" option. Now Search for ( Using CTRL+F ) </header> tag. Below it you will find code something like this

Now just change the Underlined Word with the Title of your Choice
If you find any problem with the template please do tell us by leaving a comment below.See Demo
Download


0 comments:
Post a Comment