Hi everybody , this is a new Blogger template. The name might be a little unheard , but it means Simple in Latin. I have used a lot of CSS3 essentially shadows and border-radius property. The header design is quite similar to the Dynamic Views template and it is Responsive like the previous template (No horizontal scroll-bar till 580px). It has threaded comments but now with Circular avatar picture. The colors used are overall of lighter shade and give a kind of soothing effect.DemoDownload Complete List of Features
-Responsive design (No horizontal scrollbar till 580px)
-Cross browser compatibility
-Page Navigation
-Widgets ready sidebar
-Its own Related Post widget
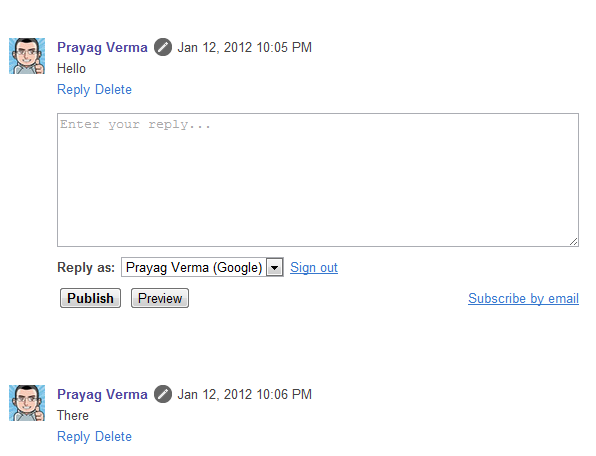
-Stylish commenting system with Circular Avatars
-Attractive Post Title with hover and active states
-jQuery and CSS3 powered Header design
-Three column footer
-Threaded Reply feature for Blogger Comment system
-Eye-catching Sidebar Design
-Search Engine Optimized
-Near W3C Valid
-95%+ Google Page Speed score -Integrated Menu and Search Box-CSS3 shadows around post area-Inbuilt FB and Twitter Icon-Attractive web fonts like Trade Winds and Playball-Appealing "Read More" button with hover and active states-Modified input and select fields-Responsive ImagesHow to configure the features:1.MenuThe menu is just below the Header and automatically displays all the pages of the blog. Firstly when you install it on your blog, go to Layout (or Page Elements) and remove the title of that widget. The title should remain blank for it to display the pages correctly. In case you are using the New interface then you can easily add custom links to this menu by going to Pages in the Dashboard and then choosing Web Address in the New Page option.
2.Page NavigationTo change the number of posts to be shown on using pagination find the term postperpage ( Using CTRL+F ) ,There will be a script something like this<script type='text/javascript'>
var home_page="/";
var urlactivepage=location.href;
var postperpage=3;
var numshowpage=6;
var upPageWord ='Previous';
var downPageWord ='Next';
</script>
You can change the number values as you like in the above code.
var postperpage=9; → Changes the no of posts that will show up on clicking any page number.
var numshowpage=3;→ Changes the number of linking to show in the widget
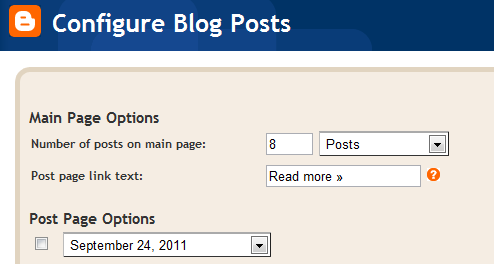
Note: Make sure that you also set the value of Number of Posts on Main Page (Go to Design > Page Elements , Click on Edit option of Blog Post and then Number of posts on main page: ) to same as that of the postperpage value.
3.Enabling Reply option for the commentsThe the reply option in the comment will have to enabled . Just search for the term blogid= ( using CTRL+F ) with "Expand Widget Preview" option ticked. You will see something like this "blogID=XXXXXXXXXXXX" replace this XXXXXXXXXXX number with your Blog's ID. [To find your Blog's ID just Open Design Tab and in the Address bar of your browser there will be a very long number , just paste that here]
4. Deleting Navbar and Attribution widgetIf you are using Simple templates or any other default Blogger template, Then it might happen that the NavBar and Attirbution widget would be visible in the sidebar just after installing the template. To remove these widgets you will have to Edit HTML of the Blog and search for something like "Navbar" & "Attribution". These too things you will find inbetween b:widget tags . Remove everything including these tags which will look something like this
<b:widget id='Navbar' >....................................</b:widget>
Note: Interestingly this can only be done in the Old Blogger Interface. In case you try it in new Blogger interface ,it will always crash.
5. HeaderThe header text can be changed easily using the Header widget present in the Page Elements (or Layouts ). If you want to add a background image ,then search for the following term .header{ and you will see something like this
.header{background-image:-moz-linear-gradient(center top, rgba(255, 255, 255, 0.1), rgba(100, 100, 100, 0.05));background-image:-webkit-gradient(linear, left top, left bottom, from(rgba(255, 255, 255, 0.3)), to(rgba(255, 255, 255, 0.05)));background-attachment:scroll;background-color:rgba(243, 243, 243, 1);-moz-box-shadow:0 0 5px 0px rgba(0, 0, 0, 0.3);-ms-box-shadow:0 0 5px 0px rgba(0, 0, 0, 0.3);-o-box-shadow:0 0 5px 0px rgba(0, 0, 0, 0.3);-webkit-box-shadow:0 0 5px 0px rgba(0, 0, 0, 0.3);box-shadow:0 0 5px 0px rgba(0, 0, 0, 0.3);height:90px !important;position:absolute;top:0px !important;left:0px !important;width:100% !important;z-index:1001;display:block;-webkit-box-shadow:0px 3px 30px rgba(0, 0, 0, 0.1);-moz-box-shadow:0px 3px 30px rgba(0, 0, 0, 0.1);box-shadow:0px 3px 30px rgba(0, 0, 0, 0.1);}
Remove all the background- attributes from the above code and replace it with a single attribute containing the URL of the background ,something like this: .header{background: url(IMAGE-URL);-moz-box-shadow:0 0 5px 0px rgba(0, 0, 0, 0.3);-ms-box-shadow:0 0 5px 0px rgba(0, 0, 0, 0.3);-o-box-shadow:0 0 5px 0px rgba(0, 0, 0, 0.3);-webkit-box-shadow:0 0 5px 0px rgba(0, 0, 0, 0.3);box-shadow:0 0 5px 0px rgba(0, 0, 0, 0.3);height:90px !important;position:absolute;top:0px !important;left:0px !important;width:100% !important;z-index:1001;display:block;-webkit-box-shadow:0px 3px 30px rgba(0, 0, 0, 0.1);-moz-box-shadow:0px 3px 30px rgba(0, 0, 0, 0.1);box-shadow:0px 3px 30px rgba(0, 0, 0, 0.1);}6. Some other features
>>To add border across images add a class="thumb" in the img tag
>>To make images with rounded edges , add a class="image" in the a tag surrounding the img tag.
>>The images are scaled down in smaller screens ,never exceeding the white post area
>> If you want to add buttons like the Read More one ,you can achieve it b adding a class="button" in a a tag something like this:
<a href="URL" class="button" >Button</a>
These also have option to add a small symbol just before them ,like for example a arrow
<a href="URL" class="next button" >Button</a>
For complete list of options check this URL
This template could not have been possible without Codrops (Header Text) ,RDT (Buttons) and CSS-Tricks (a lot of things)
I hope you like the template and don't hesitate to the ask about any problems you face while using the template.DemoDownload